Over the years, my diet has undergone upheaval after change after change after upheaval. My cooking and baking have had to stop and regroup and take on a whole new shape with each change. The first, over twenty-five years ago, was giving up dairy. Wow. That was earth-shaking for us. Almost our entire diet consisted of Mexican and Italian foods, and our fridge was heavily stocked with all kinds of dairy products at all times. Over time we adapted, until living dairy-free became our norm. Our kids grew up in a home that was almost entirely dairy-free.
About twenty years ago, I started having trouble with garlic, tomatoes, and chocolate. It took a while, but I was able to figure out which foods were the culprits behind my digestive distress. Giving up garlic and tomatoes was not easy, but I was able to make that change. Chocolate, though...that was a long, painful struggle. It took over two decades for me to reach the place where it rarely tempts me.
Nearly a decade ago, I hit another big change. After months of misery, I found a naturopath who ran blood tests to discover food intolerances. My results were surprising...and not surprising. My system was in a complete state of panic and had at least some reaction to every single food on the list. At the same time, I learned that I am insulin-resistant (a condition that often leads to diabetes).
These discoveries necessitated a comprehensive overhaul of my entire food world.
No eggs, dairy, wheat (or any wheat-type grain), soy, almonds, garlic, tomatoes, chocolate, peanuts, onions, asparagus, cranberries...
...greatly reduced intake of starches and sugars... not easy for a sugar addict like myself.
In time, I was able to adapt to this restricted diet. It has not been easy, but I have learned how to eat within those limited parameters.
As time passed, I found that more foods have started to bother me: sorghum, cashews, fresh greens...potatoes, bell peppers...
This has all been a profound challenge, and has taxed my ingenuity as I've adapted and invented recipes to make it all work.
And now.....now it is not a dietary change, but a life change that has thrown my baking another curve ball.
My husband and I have begun our life of living full-time in an RV (bumper-pull/travel trailer/pull-behind trailer). As someone who cooks and bakes from scratch (partly from preference, mostly of necessity- I cannot eat most prepared foods), this new living situation presents some stiff challenges.
For a trailer, the kitchen is good-sized......but for a baker? Wow. I'm working with about an eight-inch by sixteen-inch space on the counter, for all bowls, ingredients, mixing and shaping. And the oven is a typical RV oven- fifteen inches square! And it is a gas oven. I have used a gas stove/oven before...but that was about twenty-nine years ago.
So, here I am again, in a phase of comprehensive change, figuring out yet again how to make it all work. I have just finished my first attempt at tiny-space baking.
Oh, and I can't seem to find the baking sheet that I bought to fit this oven...so I baked scones on the pizza stone....which will take another level of adaptation and experimentation.
The scones are alright. The dough was far too wet, so they are very fragile, but the flavor is good. The bottoms burned but as long as I just eat the tops, they'll be fine. :)
It should be an interesting ride, continuing to produce food that I can eat, in tight quarters, under constantly changing elevations and conditions. :)
Showing posts with label egg-free. Show all posts
Showing posts with label egg-free. Show all posts
Wednesday, December 12, 2018
Friday, June 22, 2018
"Everything-free" Cherry & Almond Muffins

My husband said that these are his favorite of my bakes, so far. I am happy with how they've been turning out, too, so I thought it was time to share the recipe with you. :)
I use sweet cherries, as I am not a fan of sour. The first time I made these, I used sweet Bing cherries. I pitted and chopped them, then spread them out on a baking sheet and froze them. That way, when I mixed them into the muffin batter, the cherry juice did not immediately turn the batter purple. It worked well, but it was time-consuming and the muffins took much longer to bake. I've made them again since then, using Bing cherries, but skipping the freezer and just putting the chopped cherries straight into the batter. This also worked well. They still looked fine and tasted good.
This time around, I used Rainier cherries. It feels extravagant to me to use these in baking, but there is a reason. :) I usually only buy Rainier cherries once or twice a year. They are only available for a short time during the summer, and they are far more expensive than our standard sweet Bing cherries. Rainier cherries are just delicious, so I look forward to their advent every summer.
When I saw them in our local grocery store for only 3.99 a pound, instead of eight or nine dollars a pound, I was happily surprised. I bought some, of course, and was excited to have them for a snack. I washed a small bowlful and sat down to savor this perfect summer treat. Imagine my disappointment when I bit into the first one and found it to be flavorless and sour! I ate them anyway, as I was very hungry and they were food, even if they did not taste good. What a let-down!
I don't like to waste food, but I did not want to eat any more of those Sour Cherries of Disappointment, so I decided to put them in muffins.
I made two batches of muffins this morning, as our daughter Heather and I are taking a little road trip. (We're going over to Idaho, to visit my husband's mom.) Given my food limitations (and hers) we travel with our own food for most meals.
Usually, I simply pit the cherries, chop them up, and stir them into the batter. Given how sour these are, I macerated them first- chopped them, added sugar, and let them sit. This draws out the juices, and will hopefully temper their sourness in the muffins.


I have a handy little gadget for pitting cherries. Recently, I have used it for removing the pits from Castelveltrano olives. It worked well for that, but it seems to have messed up the alignment of the pitting gadget. It still works pretty well, and makes it much faster to remove the pits (stones) from fresh cherries.


"Everything-free" Cherry & Almond Muffins
Gluten-free, dairy-free, egg-free, soy-free, nightshade-free
Makes 12 regular-sized muffins
Bake at 350 degrees Fahrenheit ~ 18-22 minutes
Dry ingredients:
1 cup millet flour
1 cup tapioca starch
1 Tablespoon flax meal
see my post on May 4, 2018-Replacing Eggs: Flax Gel and Flaxmeal
2 teaspoons baking powder
1 teaspoon coconut flour
1/2 teaspoon xanthan gum
1/2 teaspoon salt
Wet ingredients:
1/2 cup unsweetened applesauce
1/3 cup light agave nectar
1/3 cup granulated sugar
I use organic granulated sugar- it has more the taste and texture of raw sugar, which I like.
1/3 cup oil (I currently use a light avocado oil, or grapeseed oil)
2 teaspoons melted coconut oil
see my post on March 3, 2018- Replacing Eggs In Baking
2 teaspoons almond extract
I can't tolerate almonds themselves, but so far, the extract does not seem to bother me.
Add-in:
1 cup sweet cherries, washed, stems removed, pitted and chopped
(as mine were sour, after chopping I added 1/4 cup sugar and let them sit while I mixed up the batter)
*1/4 cup was a little much. If doing this again, I'd only use 2 Tablespoons sugar.
~ a little more granulated sugar to sprinkle on top of the muffins
Directions:
Preheat oven to 350 degrees. Line muffin tins with paper baking cups.
(I prefer the If You Care brand of unbleached baking cups. They're supposed to be a more healthy option, but my favorite thing about them is that they peel off of the muffins easily.)
Combine dry ingredients in a large mixing bowl. In a separate bowl, combine the wet ingredients. Add the wet ingredients to the dry and stir to combine. When the wet and dry are about halfway mixed, add the cherries. Fold the cherries in until the batter is just mixed.
Spoon or scoop the batter into the prepared tin. I like to use a cookie/ice-cream scoop. The one I use holds about two tablespoons of batter. Sprinkle the tops with a little bit of granulated sugar. This helps avoid the sticky tops that gluten-free muffins can have, after they are baked.


Bake for 18 minutes, then check by gently pressing on the top of a muffin. If it squishes, they need more time. If it gives a little, but does not stay dented, they should be done.
Turn the muffins out onto a rack to cool. Remember that fruit like cherries or blueberries holds heat for a long time, so do let them cool a few minutes before eating. I have burned my mouth from being too impatient for fruit muffins. :)

Enjoy!
If you make these, I'd love to hear how they turn out for you.
P.S. One of my pet peeves is having to scroll past forty thousand photos of the same thing, to get to the actual recipe on a blog. Because of this, I usually only include one photo of my finished product. Today, though, I felt like doing more, as the cherries were so pretty, and I wanted to show the process and tools that I use. I hope you enjoyed baking with me. :)
Friday, June 15, 2018
"Everything-free" Lemon Cupcakes with Lemon Sugar Glaze (gluten-free, vegan)
I love lemon-flavored things. They represent all the sweetness and sunshine of summer, to me. I needed a dessert to take to a church potluck last week, and decided to make these. They turned out well, and got good reviews.
Rather than full-sized cupcakes, I made mini cupcakes for the potluck. A box of gluten-free cake mix only makes one cake layer, or one dozen cupcakes. I wanted to spread the joy a little more evenly, without using a second mix, and I decided that a whole plate of mini cupcakes was the answer. They were very cute and looked most tempting. :)

One of these days, I hope to be able to make really good, from-scratch cupcakes. Until then, I am happy with the results I get from the Betty Crocker gluten-free cake mixes.
Lemon Cupcakes with Lemon Sugar Glaze
gluten-free, dairy-free, egg-free, soy-free
Makes 12 cupcakes, or 24 mini-cupcakes + one shallow cake layer
Heat oven: 325 degrees Fahrenheit for dark or non-stick pans, 350 for shiny pans
Line cupcake tin with baking cups, line bottom of cake pan with parchment paper
Cake
Dry ingredients:
1 box Betty Crocker gluten-free yellow cake mix
*contains potato and rice ingredients
Fat and wet ingredients:
1 stick (1/2 cup) Earth Balance soy-free butter substitute
2/3 cup water
1/2 cup flax gel (egg replacer)
see my post on May 4, 2018-Replacing Eggs: Flax Gel and Flaxmeal
1 Tablespoon melted coconut oil (also egg replacer)
see my post on March 3, 2018- Replacing Eggs In Baking
1 Tablespoon fresh lemon zest (zest of one large lemon)
2 teaspoons lemon extract
(I used extract, as using fresh lemon juice does weird things to the texture)
(optional: 1 teaspoon vanilla)
( I used vanilla powder, which does not darken the batter the way vanilla extract does.)
Glaze
when cakes are completely cooled
1 cup powdered sugar (confectioner's sugar)
2 tsp- 1 Tablespoon fresh lemon juice
The directions on the box mix say to use the "all-in-one" method of mixing the batter- dumping everything in at once. I have tried it this way, and adding the fat first, then the liquids. I don't see a big difference either way, so I do what the box says. :) Continue beating until the batter is nice and smooth, about one or two minutes, usually. Do not over-mix, as this will result in dry, crumbly cupcakes.
I like to use an ice-cream/cookie dough scoop for putting the batter in the cupcake tin. This is neater than using a spoon, and makes it easier to get equal amounts of batter in each cup.
Bake:
In pre-heated oven, the mini cupcakes took 12 minutes, at 325 degrees;
the shallow 8" cake layer took 15 minutes.
After removing from the oven, let sit for just a couple of minutes in the pan, then remove and set on a cooling rack. Let them cool completely before glazing.
Glazing:
Once cupcakes are completely cooled, make the glaze. Put something (like a plate, or a sheet of parchment paper) under the cooling rack, to catch any drips or spills. Spoon a little bit of glaze onto each cupcake or cake and spread just to the edges. This glaze recipe made enough that I was able to add a second coating of glaze to all of the cupcakes. Let set until glaze is no longer wet.
Enjoy! :)
Friday, June 8, 2018
"Everything-Free" Lemon Blueberry Muffins
For a while now, I've been tinkering with my muffin recipes. Since realizing that the butter-substitute that I've used is causing me some problems, I've had to reconsider my whole approach to making muffins. Switching to oil, rather than a solid fat, requires an entirely different balance of ingredients. The first few attempts were tasty, but came out with deep dips in the middles. I soldiered on, trying for the right balance of delicacy and strength.
The batch that I made this morning turned out pretty well, so I thought I'd share it with you all.

These are sturdy enough to not sink in the middle, but still tender and moist. The flavor is good, and the balance of sweetness, to the tartness of the lemon, is about right.
"Everything-free" Lemon Blueberry Muffins
gluten-free, dairy-free, egg-free, soy-free, nightshade-free
Makes 12 standard-sized muffins
Bake at 350 degrees Fahrenheit for 18-20 minutes
Dry ingredients:
1 cup millet flour
1 cup tapioca starch
1 Tablespoon flaxmeal
2 teaspoons baking powder
*if you are corn-sensitive, there are recipes online for corn-free substitutes for baking powder.
I have done this at times, as our daughter is sensitive to corn, and it seemed to work fine.
1 teaspoon coconut flour
1/2 teaspoon xanthan gum
*xanthan gum can be derived from corn. If you are corn-sensitive, it may be safer to use guar gum.
1/2 teaspoon salt
Wet ingredients:
1/2 cup unsweetened applesauce
1/3 cup light agave nectar (or other liquid sweetener)
1/3 cup sugar
(I use organic granulated, which is similar to turbinado or raw sugar. I like the flavor it gives)
1/4 cup neutral oil (I used grapeseed oil)
2 teaspoons liquid coconut oil
2-3 teaspoons fresh lemon juice
Zest of one lemon
Lemons vary wildly in size, which could give greatly different results. Next time, I'll measure
so I know just how much I use. I would guess that I used about 2 teaspoons of zest this time.
These were quite lemony, almost on the edge of being too tart for me. Next time, I think I'll use
slightly less zest, and see if that gives a little better balance.
Add-in:
1 cup blueberries (I used frozen)
Topping:
A bit of granulated sugar
Preheat oven to 350 degrees Fahrenheit. Line a muffin tin with baking cups (I grew up calling them cupcake papers or muffin cups) . I like using the "If You Care" brand of unbleached baking cups, because it seems a healthier choice, but also because the muffins release from the cups so neatly.
Whisk together dry ingredients in a large bowl. In a separate bowl, whisk together wet ingredients, add to dry ingredients and begin to stir together. Add in blueberries, and stir until just barely combined. Scoop or spoon into prepared muffin tin. I use a cookie/ice-cream scoop that holds about 2 Tablespoons of batter. This makes the scooping part quicker and less messy.
Sprinkle the top of each muffin with a pinch of sugar. Gluten-free muffins can develop a gooey, sticky top once they cool. The little sprinkle of sugar helps to prevent this.
Bake at 350 degrees for 18-20 minutes, until the top of a muffin no longer squishes when gently pressed.
Remove from the pan and let sit on a cooling rack for a few minutes. Blueberries hold heat very efficiently. I have burned my mouth more than once from diving into a fresh blueberry muffin too quickly. :) If you leave them in the baking pan, the bottoms and sides keep baking, becoming dark and leathery. Dark and leathery are words that do not fit the sweet delightfulness of muffins. :)
Enjoy!
Friday, June 1, 2018
Tuna Salad My Way :)

Fish and I are not friends. I have a hard time gearing up to eat fish. It was not always this way. I grew up in a family that loved to go fishing and I enjoyed fish pretty well. My favorite was when we went back-packing in our favorite wilderness area. Eating wild fish Whitefish, Brown Trout, Rainbow Trout or Dolly Varden, caught from clean water, cooked over an alder wood fire.....that was tasty! The change came in my early twenties. It all started when I was pregnant with our second child. The fish department at the store where I did our grocery shopping smelled very bad, every time I was there. I think that the heightened sense of smell during pregnancy did not help the situation. Ever since then, I just can't stand most fish.
I've been trying, actually, because fish is so good for us. I can do salmon once in a while. I can handle albacore tuna, also once in a while. I used to enjoy fish-and-chips, but I can't eat it anymore. Sad. You could take just about anything, dip it in batter and deep-fry it, and I would be a happy camper. :) I miss all of the so-unhealthy, greasy and delicious fried foods! My body is probably grateful that I can't eat like that anymore! ;)
The only fish that I actually like is Orange Roughy. This, of course, is hard to find. They have been over-fished, so the harvest is restricted. I'm not complaining. I'm glad they're trying to preserve the population and not let it get wiped out!
So, all of that being said, when I find a way that I can enjoy fish, it is cause for celebration. This salad works for me. I have it about once every couple of weeks. Today was actually the first time that I added cabbage to it, and I liked it a lot. It was nice to have the crunch of the cabbage, in counterpoint to all the softer things. :)
Tuna Salad My Way
1 cup chopped cabbage
(I had purple cabbage on hand, so I used that. I liked the color contrast)
5 ounces good albacore tuna, drained and broken up into chunks
1/3 cup sliced olives
I sometimes add a few "fancy" olives, such as Kalamata or Castelveltrano, for added flavor
1 ripe avocado, peeled and cubed
1 - 1 1/2 tablespoons olive oil
1 - 2 teaspoons lime juice
(I love lime. You can, of course, substitute lemon juice or a vinegar that you like)
1/4 teaspoon salt
~as I was enjoying my lunch, I thought that some shredded carrot would probably be good in this. It would boost the nutrients, and add another pretty color. For those who can eat them, some green onions would probably be good. Or chopped celery or cucumber. :) Or diced bell pepper. The possibilities are many. :)
Friday, May 18, 2018
Cinnamon Applesauce Waffles
This is my current work-in-progress. I think that the texture could still use some fine-tuning, but overall I'm happy with these. :)
I wanted to see if it would work to use applesauce as an egg-replacer in waffles, rather than the flax gel I've been using. This changes the liquid-to-dry balance, so I added more millet flour as well as a bit of flaxmeal. I had thought that they might turn out floppy, but they have a good level of "crisp." As with all gluten-free waffles that I've made, they're fairly hard when they first come out of the waffle iron, but after sitting for a bit they soften somewhat- becoming crisp rather than crunchy.

Cinnamon Applesauce Waffles
gluten-free, dairy-free, egg-free, vegan, soy-free, nightshade-free, corn-free
In our waffle maker, which makes four large squares per batch, this makes close to two batches,
so.....about seven individual waffle squares.
First thing:
3/4 cup milk alternative
2 Tablespoons apple cider vinegar
~combine and let sit
Dry ingredients:
1 1/4 cup millet flour
1 cup tapioca starch
1 Tablespoon coconut flour
1 Tablespoon flax meal (regular, or golden)
2 teaspoons baking powder
2 teaspoons cinnamon
1/2 teaspoon xanthan gum
1/2 teaspoon salt
1/4 teaspoon baking soda
Wet ingredients:
1/2 cup unsweetened applesauce
2 teaspoons liquid coconut oil
1/3 cup oil (I used a mild avocado oil)
(2 teaspoons vanilla)
2 Tablespoons coconut sugar
In a large bowl, whisk together the dry ingredients. In a separate bowl, whisk together the wet ingredients. Add the wet to the dry, along with the milk-vinegar mixture. Whisk well until smooth. Let sit while the waffle iron heats.
As with all gluten-free waffles and pancakes, I oil the cooking surface for each batch. Currently, I use a standard baking spray to oil the waffle iron.
When the waffle iron is ready, scoop or spoon batter onto the hot surface and bake according to instructions for your particular waffle baker.
I put these onto a cooling rack once they're done. If they sit on a plate, the undersides get very soggy. I actually prefer the texture if they sit on the rack until they're cool, and then I butter them and reheat in the microwave.
If you have any leftovers, they're best stored in the refrigerator. You can reheat in either a toaster or a microwave.
Enjoy!
*I've been steering away from vanilla lately, as it's frightfully expensive right now. Vanilla does make things tasty, but this recipe would work fine without it. I think that next time I make these, I'll leave out the vanilla and add a little coconut nectar instead. Agave nectar or honey would probably be good, too.
Saturday, May 12, 2018
"Everything-free" Not-banana Muffins
"Everything-free" is our family's word for things that fit my food world. The list gets long- wheat-free, gluten-free, egg-free, dairy-free, soy-free, banana-free, almond-free, corn-free, potato-free, rice-free... Calling things "everything-free" just makes it simpler. :)
I have been working on my muffin recipes recently, trying to solve a problem. Since realizing that the butter substitute that I use has been bothering me, I have had to switch from a creamed solid fat method to using oil in muffins. The first result was that they all have a deep dip in the center. This is not a deal-breaker for eating them, but it does make them less attractive. To put a recipe out, without solving this issue, didn't feel right.
This specific recipe was born through a totally different experiment. I was making something else, and used coconut nectar as the sweetener. With the first bite, I thought, "This almost tastes like banana." The creative part of my brain perked up at that and started humming busily. I have missed banana bread so much. Yes, bananas are part of the long list of foods that bother me in one way or another.
After a couple of batches and a little tinkering, I have come up with something that I like.
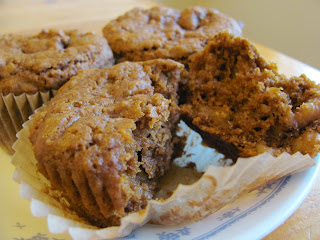
They do not taste like banana, but they have the texture and moistness of a banana muffin, and the coconut sugar and nectar give it a similar fruity sweetness. I made the final version this morning, and we like them!
Of course, a person could easily substitute honey and granulated sugar for the coconut sweeteners. They would still be quite tasty, but would lose the resemblance to banana. Molasses would also work well, and would probably make them reminiscent of bran muffins. In fact, that is an experiment that I will probably make myself, in the near future. I also miss bran muffins. :)
The other reason that I chose to use coconut sweeteners is that I'm trying to reduce the glycemic impact of my baked goods. Sugar is a deeply important part of the chemistry of baking. A person can't just yank out the sugar and expect the same results of texture and flavor. Coconut sweeteners do still impact blood sugar, but less severely than regular granulated sugar.
Muffins, in my world, fall into the same "happy comfort food" family that includes pancakes and cupcakes. There is just something about these foods that makes me happy. :)
"Everything-free" Not-banana Muffins
wheat-free, gluten-free, oat-free, egg-free, dairy-free, banana-free, soy-free, almond-free
350 degrees - 18-20 minutes
12 muffins
Dry ingredients:
1 cup millet flour
1 cup tapioca starch
2 teaspoons coconut flour
1/4 cup flaxmeal
1/2 teaspoon xanthan gum
1/2 teaspoon salt
2 teaspoons baking powder
1 1/2 teaspoons cinnamon
Wet ingredients:
1 cup unsweetened applesauce
1/2 cup coconut nectar
1/3 cup light neutral oil (I used a light avocado oil)
1/3 cup coconut sugar
2 teaspoons melted coconut oil
Add in:
1 cup roughly chopped walnuts
Preheat oven to 350 degrees. Line muffin tin with baking cups. *
In a large bowl, combine all dry ingredients and whisk together well.
In a separate bowl, combine the wet ingredients.
~to melt the coconut oil, I scoop some into a small dish and heat it in the microwave.
In our microwave, it only takes twenty or thirty seconds to melt this little bit of oil
Add the wet ingredients to the dry and stir to combine. When about halfway combined, add the walnuts. Stir until the ingredients just come together, with no more clumps of flour. Spoon or scoop into the prepared tin. I like to use a ice cream/cookie dough scoop for this.
Bake for 18-20 minutes. I have found that in our oven, 20 minutes is just a little too long.
Turn the muffins out onto a cooling rack. If they stay in the hot tin, the outside will continue to brown and will get tough. Enjoy!
*I like to use the If You Care brand of baking cups. They're made from unbleached paper. I like knowing that they're free of chemicals, and they have a great added bonus. With regular muffin papers, the muffins often stuck to the paper and got torn apart when we tried to peel the paper off. With the If You Care brand, the papers come off neatly!
Friday, May 4, 2018
Replacing Eggs: Flax Gel and Flaxmeal
I use various egg-replacers, depending on what I'm making. I like the applesauce/coconut oil combination very much, for muffins and pancakes. This gives a lovely moisture and softness.
Soft is not what you want for waffles, so I chose to use flax egg-replacers.
Flax Gel
Add flax seeds to water, bring to a boil, lower heat and continue boiling for 2 minutes. Strain out seeds. Store gel in the refrigerator.
Making the gel:
Use a ratio of 1 cup of water: 1 Tablespoon of flax seed
Either brown or golden flax seed; both work well. The golden seems to have a more mild flavor.
Eggs are usually about 1/4 cup each, so it would make sense to use 1/4 cup of flax gel per egg in a recipe. When I made waffles using flax gel, I only used 1 Tablespoon per egg, and it worked well. I'm not sure why that is, but that is what worked.
For each egg:
If you try this for other recipes, start with 1 Tablespoon of gel per egg replaced, and add more if needed.
When freshly made, the gel is easy to measure. Once refrigerated, it gets interesting. It develops a texture more like egg white. When I tried pouring cold flax gel into a tablespoon, all of the gel *blooped* out! I think that whisking it up with a fork would probably help. Thankfully, I was able to rescue the gel and still use it, so it was more funny than frustrating. :)
I usually add some melted coconut oil with any egg replacer (the yolks have saturated fat, which can be important for texture), but the waffles seemed fine without it. Another time, I'll try adding it and see if it makes a difference.
Flax meal
Flax meal can work well as an egg replacer, if it fits the character of your project. If I am making a light vanilla cupcake, I do not use flax meal. It is like adding wheat germ or bran to the mix. It alters the texture, and you definitely see the flecks of meal in the final product. It has worked well for me in chocolate cake and cupcakes, and more hearty pancakes or muffins.
When I used flaxmeal in the waffle batter, I didn't like it as well. Curiously, they baked less evenly. They didn't crisp up as well, and softened more quickly.
For each egg, use:
1 Tablespoon flax meal and 2-3 Tablespoons of water.
Sometimes, I mix the flax meal and water together, and let it sit before adding with the dry ingredients. Sometimes, I add the meal with the dry ingredients, and the water with the other liquids. I have not seen a dramatic difference in results. Either way seems to work just fine. If I add them separately, I do let the batter sit for a few minutes, so the flax meal can become hydrated.
Friday, April 27, 2018
Cinnamon Bit Fry-cakes

Really, these are pancakes, but "fry-cakes" is just such a fun word that I had to use it. ;)
Usually, I cook pancakes on our electric griddle, but yesterday I just didn't feel like clearing the space and hauling it out. I fried these up in a ceramic-lined non-stick skillet...and they were so good! <3
Funny that when I cook them on a griddle, they're "pan" cakes, but cooked in a pan, they have other names. Some people call them hotcakes or flapjacks. Because they had that delectable crunch from being fried in oil, "fry-cakes" just fit the best.
The cinnamon bits that I use are from the King Arthur Flour website. There are cinnamon chips available in some grocery stores, but I don't like them. To me, those just taste like Red-Hots candy; all heat and no real cinnamon flavor. They also usually contain trace amounts of dairy. The bits from King Arthur melt into pockets of delicious real cinnamon goodness when they bake, and they are now dairy-free! :)
Here's the link, in case you want to check them out:
https://www.kingarthurflour.com/shop/items/cinnamon-sweet-bits
They also have these delicious things that they call "jammy bits," which are little gummy nuggets of fruit puree. When they're baked, they really do seem like little bits of real fruit jam. So good! :)
https://search.kingarthurflour.com/search?p=Q&view=grid&deftab=products&w=jammy+bits
Okay, now to the recipe...
This is a work in progress, like all my recipes, but especially so since I just made them for the first time yesterday. They were so good, though, that I wanted to share them right away.
Cinnamon Bit Fry-Cakes
Makes about 12 - four inch cakes
Dry ingredients:
1 cup millet flour
1 cup tapioca starch
1 Tablespoon baking powder (I may try a little less, next time)
1 Tablespoon coconut sugar (other sugars would work fine; this is what I used and it was good)
1/2 teaspoon xanthan gum
1/2 teaspoon salt
1/2 teaspoon cinnamon
Wet ingredients:
1/2 cup unsweetened applesauce
1/4 cup oil (I used a mild avocado oil; any mild neutral oil will do)
2 teaspoons melted coconut oil
3/4 cup alternative milk (I use unsweetened original-flavor Coconut Dream coconut milk)
Add-in:
2 Tablespoons cinnamon bits from King Arthur Flour Company
Combine the dry ingredients in a large bowl. In a smaller bowl, combine the wet ingredients. Add them to the dry ingredients and mix well. Stir in the cinnamon bits, then let the batter rest while you heat your skillet.
I used a ceramic-lined non-stick skillet. On our (glass-top) stove, I set the burner to medium at first, but turned it down about halfway through the batch.
Pour about two tablespoons of oil into your pan and heat on medium (or a little below medium) heat. To check if the pan is ready, drop a little bit of the batter into the oil. If the oil bubbles and sizzles around the edges, it's ready. Drop batter into heated pan carefully- about 1/4 cup batter per pancake. Flatten/spread slightly. Let them cook until the edges look set and the bottom is a nice golden brown. Flip and cook the other side, until it is also nicely browned and the cakes are cooked through. Add a little more oil to the pan for each batch. If the fry-cakes are getting too brown before the middle is cooked, lower the heat. If they take a super long time to brown, raise the heat.
With the "juiciness" from being fried in oil, I did not feel a need to butter these, but my husband liked them better buttered. Also, they were sweet enough that I did not want any syrup on them.
The cakes came out about 3 1/2-4 inches in diameter, and I ended up with about twelve cakes.
My mind is popping with other ideas, such as adding bits of walnut to these. Can't wait!
If you try them, please leave a comment and let me know how they turned out for you. :)
Thanks for stopping by!
Friday, April 20, 2018
Birthday Goodness (Vanilla Poppyseed Cake)
Birthday Goodness
*tiny miracle ~ I figured out how to add photos! :)
Vanilla Poppyseed cake with Caramel Orange Frosting

I am fifty years old today! I have actually been excited to reach this milestone birthday.
I simply love fresh starts and clean slates: new days, new years, and especially new decades. Stepping into a brand new half-century is, for most people, a once-in-a-lifetime event! :)
I usually bake my own birthday cake, because I love to do it. :) It is part of the fun for me. I debated about what to bake this year. Should it be the moist chocolate cupcakes with chocolate frosting that received such a good response from my family? Or what about the lemon cupcakes with lemon "butter"cream that they liked even more than the chocolate?
Those are both delicious, but I think I want to try something entirely new.
.....hours later.... That's what I did! It turned out pretty well. I still need to fine-tune the frosting, but it was pretty tasty. :) In fact, I'm enjoying another piece as I write this. :) The cake is a good texture- moist and tender. It's not as light as a wheat-based cake, but a great improvement over some gluten-free cakes I've had. It received enthusiastic thumbs-ups from my hubby and our son this evening, and requests for second helpings. :)

Vanilla Poppyseed Cake (with Caramel Orange "Butter"cream Frosting)
*gluten-free, dairy-free, egg-free, soy-free, vegan, etc. etc.
**contains nightshades**
I am just beginning the journey of learning to bake nightshade-free, so I don't have every recipe switched-over yet. This one starts with a mix that contains potato starch, and uses a butter-substitute that has pea protein in it. For those of you who have no trouble with those things, I hope you enjoy this bake. :)
**Each Betty Crocker box mix makes one layer! This is important to know ahead of time. Given the cost of gluten-free mixes, I tend to opt for making one layer, then splitting and filling it. In our small rural town, each gluten-free mix costs around five dollars, which is more than double the cost of a regular cake mix. Since we've been cutting back on sweets, having a shorter cake works better for us anyway. We still get all the yum-factor, but end up only eating half as much cake. :)
Ingredients for the cake:
1 box Betty Crocker gluten-free yellow cake mix
1 stick Earth Balance soy-free butter substitute, softened
(or 1/2 cup of the fat that works for you)
1 Tablespoon gluten-free vanilla extract
1 Tablespoon poppyseeds
1 Tablespoon melted coconut oil
1 Tablespoon flaxmeal
(the brown type works fine, but I think the gold flaxmeal would be prettier in a light cake)
1/2 cup unsweetened applesauce
3/4 cup water
Preheat oven to: 350 (if using a shiny pan) or 325 (if using a dark or non-stick pan)
Prepare pan: lightly spray, oil or grease the bottom of the pan. I also cut a piece of parchment paper to fit the bottom. This helps reduce the chance of tearing chunks out of the cake when you take it from the pan later.
Combine all ingredients in a bowl and mix well. If using a hand mixer, the time suggested on the box should work well (a total of about 2 1/2 minutes). If you're using a stand mixer like a Kitchen Aid, it will probably take less time.
*One of the benefits of gluten-free baking is that you don't have to worry about over-working gluten and toughening your finished product. I have learned, though, that over-mixing a gluten-free batter will put too much air into it, causing it to come out drier and more crumbly. Just beat the cake batter until it's nice and smooth. It will be noticeably thicker than usual cake batter.
Gently pour/scoop the batter into the prepared pan. You don't want to lose all the lightness you just beat into it, by being too rough at this point. :) Smooth out the surface of the batter and bake.
The box directions say to bake a 9x9 cake for 33-38 minutes. This will vary, depending on the altitude at which you live. If you have adjusted the temperature correctly for the type/color of pan you used, then the baking time should be close to what they suggest. I would check it a few minutes early, just to be on the safe side. (I used an 8x8 pan to bake my cake today)
Bake until the cake has started to pull away from the sides of the pan slightly, and a toothpick inserted in the middle comes out clean. If there is still gooey batter sticking to it, the cake needs more time. A gluten-free cake does not usually brown the same way a wheat-based cake does, but this one sure did. When this is done, it should be a nice golden brown color . If you press gently in the center, it should feel fairly firm. If it squishes, there's probably raw batter in the middle.
Let the cake sit in the pan for a few minutes, then turn it onto a cooling rack. If you used parchment paper, carefully peel it off. Let the cake cool completely before frosting.
Caramel Orange "Butter"cream Frosting
You can certainly make this just an orange frosting, which would be faster and easier. I do love the addition of the caramel, though. I used a homemade coconut-milk caramel. You may be able to find a ready-made dairy-free caramel, in larger towns than ours. Living in the "back of beyond," I am learning to make my own.
Here is what I did:
Coconut Caramel **totally dairy-free!!
**make ahead, so it's fully cooled when you use it
**be extremely careful when making caramel! Caramel burns are some of the absolute worst. It is like blistering-hot super-sticky glue. The only way to get it off is with very hot water, which would be agony on a burn. If I still had young kids at home, I would only do this when they were gone or sound asleep. You really have to give caramel close attention when it is cooking, and you really don't want any chance of tripping over a little person with a pan full of hot caramel! :)
1 can of full-fat coconut milk (the cans are usually around 15 ounces)
1/2 cup light brown sugar
1/4 tsp. sea salt or kosher salt
I tried it with coconut sugar, and it worked pretty well. I do think it is better with a lighter sugar,
but it worked okay. With coconut sugar or dark brown sugar, you can't cook it quite as
long as with a lighter sugar. It can easily taste a little burnt. I think that in future, I'll go back to
using light brown sugar for this.
Put all ingredients in a small-to-medium, heavy-bottomed pan. Over medium-high heat, bring to a boil, stirring several times so the sugar dissolves. Reduce the heat to medium or medium-low, and cook until the mixture has darkened and reduced (thickened). Do not stir during the second part of the cooking. The recipe I started with said to cook for 20-30 minutes. With the coconut sugar I pulled it off at a little over 15 minutes and it still seemed a little dark. So- if you use a darker sugar, expect it to be done much sooner.
I learned a secret for this process, from Mary Berry on the Great British Bakeoff. (I love that show!) She said to listen to caramel; that it is very noisy to start with but suddenly gets more quiet when it is ready. The change is not quite so obvious with alternative caramel, but still helpful to know.
Making the "butter"cream frosting:
**totally dairy-free, egg-free, gluten-free, etc. etc.
**does contain nightshades, if you use the Earth Balance
Ingredients:
1 1/2 sticks (3/4 cup) Earth Balance soy-free "buttery sticks"- softened
2 Tablespoons Spectrum palm-kernel oil shortening, softened
1 Tablespoon melted coconut oil
Zest of one medium-sized navel orange
1/2 cup-2/3 cup coconut caramel
1/2 teaspoon gluten-free vanilla extract
a pinch of sea salt
(I added several tablespoons of fresh orange juice, with was tasty, but made the frosting separate a bit. I then added a couple of tablespoons of tapioca starch, to counteract the splitting. It worked fairly well. In future, I'll try it with just the zest and see how that goes. This batch tasted good, but the texture might have been slightly better without the juice)
-Powdered sugar ~ probably about 2 cups
Most buttercream recipes call for at least 4 cups of powdered sugar. The result is far, far too sweet
for me! I always use much less. It can be tricky finding the right balance, so it doesn't seem like
you're just eating sweetened shortening. I start with about 2 cups, beat it in, then taste. If you want
it sweeter, add 1/4 cup powdered sugar at a time, until it hits the right balance for you.
**There are several organic powdered sugars out there. For our corn-free daughter, we find one of
the few organic brands that is also free of corn-starch. These tend to clump, so it's best to rub the
powdered sugar through a sieve before adding it.
The warm coconut oil and soft fats can make this pretty soft. Once it's beaten together, you can refrigerate it for a half hour to an hour, until it's a good consistency. If you want a lighter texture, you can beat it again once it has firmed up. If it gets too hard, just let it sit out at room temperature for fifteen minutes or so, until it's the right consistency for you.
For this cake, I just sliced it horizontally, spread a layer of frosting, added the top layer and spread frosting over the top. If I had wanted to do some decorative piping, I would have chilled the frosting again until it was a better consistency for piping.
I hope you enjoy experimenting with this! :)
Saturday, March 31, 2018
Replacing Eggs In Baking
My go-to egg replacement solution:
In learning how to bake without eggs, I was frustrated for quite a while. I tried flax gel "eggs," flaxmeal, powdered egg replacers...they all had good points, but the results were not entirely pleasing to me. I'm not a fan of dense, heavy, un-risen muffins! Finally, I had that "aha!" moment.
Eggs are important in baking, not only for their viscosity, but for their fat content!
Most egg alternatives only address the issues of viscosity (texture) or liquid replacement.
In removing eggs, there is also a loss of saturated fat that affects the chemistry of baking.
Coconut oil is a good, healthy fat, with many health benefits. As a plant-based saturated fat, I thought it might make a good replacement for the fat from egg yolks. But how much should I use?
I tried a couple of tablespoons on my first attempt. It was interesting. The texture of the muffins I made showed me that I was definitely on the right track, but there were pools of oil left in the muffin tin! That was not very appetizing.
I did some research on the amount of saturated fat in the yolk of an average egg, converted the grams to ounces to teaspoons, and came up with an amount that seems to work. According to what I found, there is roughly one teaspoon of saturated fat per egg yolk.
In most of my baked goods now, I use a combination of unsweetened applesauce and melted coconut oil to replace the eggs. I have had good success with this in muffins and pancakes, and some cupcakes. It warrants further experimentation. ;)
For each egg, I use 1/4 cup unsweetened applesauce + 1 teaspoon melted coconut oil
So far, this has worked well for me. In other recipes, where I use flaxmeal rather than applesauce, I still make sure to add that bit of melted coconut oil.
*I buy the single-serving cups of unsweetened applesauce and just keep them in my baking cupboard. I know it's cheaper to buy it in jars, but when I did that, I always ended up throwing out at least half of every jar. It just went moldy before I got through the whole jar. Using the little cups actually causes less waste for me. It's also handy since most of the recipes I make would have called for two eggs, and each cup of applesauce is the perfect amount for that.
Pancakes!
Or, more accurately: Pancakes, A Work In Progress. :)
Because I enjoy tinkering with recipes, trying new ideas or aiming for a better result, pretty much all of my recipes are works in progress. This one, though, truly deserves the title as I just started working with it this week.
I really love pancakes. They are a genuine comfort food for me; a guaranteed producer of happiness. Cupcakes are a happy food, but pancakes get bonus points for sheer homey comfort. I think that the recipe I started with came from my mom, which gives it a whole other level of comfort and delight.
These are fairly thin, moist pancakes, which is what I like. I'm not much into the big, thick, heavy, doughy (or dry) kind. Especially as I have gone through a journey of using less and less syrup, finally reaching the point where I skip it altogether, I need my pancakes to not be dry. If you prefer a thicker pancake, feel free to experiment with the amount of liquid. I'd be interested to hear how that works.
This is what I consider to be my basic pancake recipe. It has a hint of apple flavor, but to me it's just a tasty basic pancake.
Pancakes
Makes about 20, 4" pancakes
Dry ingredients:
In a large bowl, combine and whisk together well:
1 cup millet flour
1 cup tapioca starch
1 Tablespoon baking powder
1 Tablespoon sugar (I tried using Inulin powder instead, and it worked well)
1/2 teaspoon salt
1/2 teaspoon xanthan gum
(optional: 1/2 teaspoon cinnamon)
Wet ingredients:
In a separate bowl, combine and whisk:
1/2 cup unsweetened applesauce
1/4 cup oil (I'm currently using a mild avocado oil as my neutral oil)
2 teaspoons melted coconut oil
3/4 - 1 cup alternative milk -start with 3/4 cup, only adding the rest of it's too thick for you
(I use Coconut Dream unsweetened original shelf-stable milk)
Add the wet ingredients to the dry and stir or whisk until combined. Let sit while the griddle heats.
Heat griddle to 350 degrees Fahrenheit.
-I use an electric griddle. When I made these yesterday, I had heated the griddle to 375, but they were browning a little too quickly. I was concerned that the middles would not get cooked, so I lowered it to 350 and they did better.
-I have learned, with gluten-free things, to oil or spray the cooking surface for every batch. Sticking is a real issue. There is probably a more ideal option, but I just spray the griddle with standard cooking spray before every batch of pancakes, and it works well for me.
-I use a 2 tablespoon cookie dough scoop (similar to an old-school ice cream scoop) for putting batter on the griddle. That way, they're of a reasonably consistent size. Besides, scooping is fun. :)
Oil or spray the griddle before each batch.
Scoop or pour batter onto the griddle. Cook for a couple of minutes on the first side, until the bubbles around the edges are popping and staying open. Flip, and cook for a few minutes on the other side, until they're a nice golden brown. Enjoy! :)
~This will probably double well. Just don't quite double the salt.
I like these with just a little "butter"- a.k.a. Earth Balance soy-free spread. I do keep real maple syrup on hand for my family. Another favorite pancake topper is apple butter.
Friday, March 16, 2018
The first Friday Recipe...Grain-free Porridge
After doing research online, I put together elements of several different recipes to make something that I thought would work for me. Most use some form of almonds, which I can't eat, so I made it with hazelnut meal instead. This is what I tried this week, and I like it! Yay! :D

===================
Grain-Free Porridge
(makes about 1 1/4 cups ~ One good serving, for me)
1/2 cup hazelnut meal
1/3 cup coconut shreds
1 Tablespoon flaxseed meal
1/2 tsp. cinnamon
pinch of salt
1 cup of alternative milk
(coconut oil~ see notes)
Combine dry ingredients in a bowl. Heat the milk until it starts to steam. Pour it over the
porridge mix and stir well. Let it sit for several minutes, stir again, and enjoy! :)
===================
*The first time, I added about 1 teaspoon of coconut oil to the warm porridge, which was tasty
and added some good, healthy plant fats to my day.
*I tried adding a teaspoon of hemp hearts, which was also good.
*I'm currently using sweetened shredded coconut as that's all I can get here. Once I have a chance to go out of town, where there are more options, I'll try it with unsweetened.
*I have tried it with both coconut and hemp milks, and liked it both ways.
Coconut Dream unsweetened original shelf-stable coconut milk
Pacific unsweetened vanilla hemp milk
*This would probably be good with fruit, like blueberries or chunks of apple or pear.
*If I were using apple or pear, I'd probably try a little ground ginger with it, too.
*My favorite cinnamon is Korintje cinnamon from Penzeys spice company: penzeys.com
One way I help myself deal with my limits is by treating myself to a few special things.
This cinnamon is one of them. :) Good olives are another. :)
*Several recipes recommended the inclusion of coconut, to give it a "chew" similar to oats. I'm glad I followed their advice. It makes a good difference in the texture.
*This experiment has started me pondering on the subject of granola...maybe this porridge mix could lead to a granola that works for me! :)

===================
Grain-Free Porridge
(makes about 1 1/4 cups ~ One good serving, for me)
1/2 cup hazelnut meal
1/3 cup coconut shreds
1 Tablespoon flaxseed meal
1/2 tsp. cinnamon
pinch of salt
1 cup of alternative milk
(coconut oil~ see notes)
Combine dry ingredients in a bowl. Heat the milk until it starts to steam. Pour it over the
porridge mix and stir well. Let it sit for several minutes, stir again, and enjoy! :)
===================
*The first time, I added about 1 teaspoon of coconut oil to the warm porridge, which was tasty
and added some good, healthy plant fats to my day.
*I tried adding a teaspoon of hemp hearts, which was also good.
*I'm currently using sweetened shredded coconut as that's all I can get here. Once I have a chance to go out of town, where there are more options, I'll try it with unsweetened.
*I have tried it with both coconut and hemp milks, and liked it both ways.
Coconut Dream unsweetened original shelf-stable coconut milk
Pacific unsweetened vanilla hemp milk
*This would probably be good with fruit, like blueberries or chunks of apple or pear.
*If I were using apple or pear, I'd probably try a little ground ginger with it, too.
*My favorite cinnamon is Korintje cinnamon from Penzeys spice company: penzeys.com
One way I help myself deal with my limits is by treating myself to a few special things.
This cinnamon is one of them. :) Good olives are another. :)
*Several recipes recommended the inclusion of coconut, to give it a "chew" similar to oats. I'm glad I followed their advice. It makes a good difference in the texture.
*This experiment has started me pondering on the subject of granola...maybe this porridge mix could lead to a granola that works for me! :)
Subscribe to:
Posts (Atom)