Showing posts with label RV baking. Show all posts

Sunday, October 30, 2022

Gluten-free Apple Cobbler


Gluten-free Apple Cobbler!

I have been working on this recipe for a long time and have developed a version that I love. I wanted tender, sweet and spicy apples with a light biscuit-y topping. It took many (increasingly delicious) trials, and I thoroughly enjoyed the journey. It is great as-is, and also delectable topped with non-dairy vanilla "ice cream."

 This makes a small cobbler, just right for the two of us and for the small oven of the travel trailer that is our home. I'm working on scaling it up and will include a larger version once I've nailed it.

Apple desserts are usually best when you use more than one variety. This gives depth to the flavor. Sometimes, I just use whichever apples are going "punky" in the fridge. For my most recent version, I used Golden Delicious and Macintosh. The Golden Delicious were pale and had a surprising lemony tang, rather than golden-yellow with the basic sweet flavor I remember. Maybe they were mislabeled. This classic variety is becoming rare, as the trees don't lend themselves to current cultivation methods. 

When choosing apples for baking, I like to aim for one that is sweet and one that is more tart, though I often just go with all-sweet. Many people use Granny Smiths for baking, but I'm not a fan of their flavor or texture. {shrug} Personal preference. There are resources online showing which varieties are better for baking and which for eating fresh. As I mentioned, I often just use whatever has passed its prime and I've always been happy with the results.


Apple Cobbler

Serves 2-6

*sized for 5x8-inch glass baking dish*

Prep: 15-30 minutes

Bake: 45 minutes- 1 hour

Preheat oven to 375 degrees Fahrenheit. 

Apple mixture:

4 cups chopped apples (3 or 4 apples, peeled, cored, cut into roughly 1/2" chunks)

~toss with 1 Tablespoon tapioca starch

~combine 1/3 cup water with 1 teaspoon lemon juice, sprinkle over apples and toss well

Spice mixture:

1/4 cup sugar (Raw organic sugar. I use less sugar than others may prefer. Taste after mixing with spices, and add sugar if desired)

2 Tablespoons coconut sugar (reduces the glycemic load, adds a hint of caramel flavor)

3/4- 1 teaspoon cinnamon (if your cinnamon is strong, like Korintje, use 3/4 tsp.)

1/8 teaspoon sifted nutmeg (I always put nutmeg through a small wire mesh strainer to remove larger grains that are hard on teeth)

1/8 teaspoon powdered ginger

1/8 teaspoon salt (I usually use Himalayan pink salt)

~Whisk to combine. Add to apple mixture and stir to combine. Pour into baking dish.

"Biscuit" Topping

Dry Ingredients:

1/3 cup millet flour

1/3 cup arrowroot starch

1 Tablespoon sugar (same raw organic cane sugar as above)

1 teaspoon double-acting baking powder

1/4 teaspoon xanthan gum

1/4 teaspoon salt

~Whisk together well

Add fat:

1/4 cup Spectrum palm kernel oil shortening (dairy-free stick margarine would also work)

~ Use your fingers or a pastry blender to work in shortening. Small lumps are okay.

Liquid ingredients:

1/4 cup non-dairy milk (I use Silk brand coconut milk)

with 1/2 teaspoon gluten-free vanilla extract

Melt 1/2 teaspoon coconut oil (I use buttery flavored coconut oil) 

     (melt, if not already liquid at room temperature. I put it in a small bowl in the microwave for 15-20 seconds- just until liquid)

Combine:

Make a well in the center of the dry ingredients. Pour in the milk-vanilla mixture and stir with a fork. When mostly combined, drizzle melted coconut oil over and quickly mix in. Stir just until ingredients are combined. and dough starts to thicken. Scoop with mixing fork (roughly one tablespoon at a time) and drop blobs onto top of apple mixture in baking dish. It's fine if the apple mixture peeks through in places. You're going for a "cobbled" texture, not a solid covering. Let rest for a couple of minutes, for baking powder to start working. **

Bake, uncovered, in preheated 375 degree oven for about 45 minutes, until filling is bubbling and topping is cooked and just starting to brown in places. Depending on your oven, it may take less or more time. Start checking at forty minutes, but allow up to an hour, just in case.Remove from oven and let cool for at least ten minutes before serving.

*The filling must boil in order to thicken properly. It needs to be bubbling all the way to the center.

Serve warm as-is, or top with non-dairy ice cream, non-dairy "cream" or creamer, or even non-dairy vanilla flavored yogurt. I love how a creamy topping softens the spices and melts into the biscuit-y topping. Enjoy! Thanks for stopping by.


**Double-acting baking powder, the standard in most brands, reacts twice- once with the liquid and again with the heat from the oven.


Friday, September 4, 2020

Sunny Summer Citrus Scones (gluten & dairy-free, vegan)

 Summer may be almost over the horizon, but it's not too late for one more delicious celebration of the bright fresh flavors of this season. These scones are light, tender, buttery and delicious... and also free of most common allergens. I hope you enjoy them.


Sunny Summer Citrus Scones

vegan + no wheat/gluten, dairy, eggs, soy, almonds, rice, potato, sorghum

Makes about ten 2-3" scones

(Bake for about 18 minutes)


Preheat oven to 350 F* 


Make (non-dairy) "buttermilk

Combine, and let sit until needed ~

1/3 alternative milk (I use SoDelicious Unsweet Original coconut milk)

2 Tablespoons lemon juice 

(bottled juice is fine, but I used the juice from the lemon I zested for this recipe- zest first, then juice)


Dry ingredients

In a large bowl, combine:

2 cups gluten-free flour mix (I use 1 cup each of millet flour** and arrowroot starch)

 (plus more for rolling out dough)

2 1/2 teaspoons baking powder

1/2 teaspoon xanthan gum***

1/2 teaspoon salt

Whisk together very thoroughly. The texture will change when they're well-enough combined.

Partly mixed...

Fully mixed...

See how the texture changed there? 

(The xanthan gum is activated by two things: movement and hydration. Mixing begins the process, which is completed after the liquid is added.)

Cut in***&

1/3 cup butter alternative (I use Spectrum palm kernel oil shortening)


Wet ingredients

- the "buttermilk" mixture

3 Tablespoons honey (or agave nectar- though it may change the texture- see link in notes on flour)

1 1/2 teaspoons vanilla

zest of 1 small orange -and- 1 lemon 

(if your orange and lemon are large, only zest half of each)

Stir together and add to dry ingredients. Start stirring together, then add

2 teaspoons melted butter-flavored coconut oil

(plain coconut oil will still give a nice, buttery texture- I just like the flavor boost of the buttery kind)

Stir until combined, and dough starts to thicken. ***&&


Turn dough out onto surface lightly dusted with gluten-free flour mix.Gather dough together. Gently pat it out, fold it over onto itself; repeat a few times. Pat or roll until about 3/4- 1" thick. (They will not rise much as they bake. The height of the dough will probably be the height of the finished scones.) Cut using sharp cutter, dipping cutter in flour mix between cuts so the dough won't stick as badly. Set scones on parchment-lined baking sheet, leaving space between them. Gather scraps together, pat out and cut more scones. Repeat until all dough is used.

Bake at 350 degrees Fahrenheit for 15-20 minutes, until bottoms are a light golden brown. Transfer to a cooling rack. If left on the pan, the bottoms will continue to cook, making them tough and overly dark. Store airtight in the refrigerator; eat within 3-5 days.

Enjoy!


-------

*My oven is a small, gas-powered RV oven. It cooks high and unevenly. If you have a standard oven, you may need to bake at a higher temperature- like 375 or 400.

**Note on flour: You may need to adjust the amounts of liquid and fat. If you're using a more coarse flour, use 1/3 cup each of milk and shortening. If your flour is more fine, you may need to increase both to 1/2 cup. 

See my post on brands of millet flour and their textures for details (also, a note on agave nectar):

https://sticks-and-twigs.blogspot.com/2020/09/matters-of-flour-and-sweet.html

*** Xanthan gum serves a purpose similar to gluten in wheat flour. I know it's expensive to buy a whole bag, but you only use a small amount per recipe so it lasts a long time. The difference it makes is important, so it is definitely worth the investment.

***& Cutting in:

I use a pastry blender. You can also work the shortening in using your hands. Either way works fine. 

***&& As mentioned above, the xanthan gum is activated by movement and hydration. You don't want to over-mix the dough, but keep stirring just until it thickens. The change should be pretty obvious, as in just a few moments it goes from almost a batter consistency to a soft dough.


Tuesday, September 1, 2020

Matters of Flour and Sweet

 There is a reason that I haven't posted many recipes over the past several months. I've been struggling with the texture of my bakes; trying to figure out what changed them. Finally, I think I've solved the mystery. Two factors have been at play: flour texture and changing sweetener


*Flour

I use millet flour, mixed with arrowroot or tapioca starch, because these are the only alternative flours that my body will currently tolerate. In the past, I would stock up on millet flour through the Azure Standard company. Azure is a natural foods co-op that delivers nearly nationwide. They carried "superfine" millet flour, which was processed in a unique way that resulted in a very fine, soft flour. Now that we live on the road, it's not as simple to be a part of Azure. I did place an order when we planned to be home last winter, but the magical millet flour was out of stock. They'd had large quantities on hand, and then it suddenly all went away. I suspect that someone, maybe a chain of health-food stores, swooped in and bought all of it. That's frustrating and feels a little unfair. With that option gone, I had to start relying on what's available in stores. This was probably good in a way. Since I publish recipes using this specific flour, it's good for me to know that people may have trouble finding it. There are a couple of primary brands that produce millet flour. Sometimes I'd find one; sometimes the other. One time I filled my canister with what I had on hand, which was a mixture of the two brands. As I put the canister away, I noticed something strange. It almost looked like sand art.


That day, the lights started to dawn. I suddenly realized that my struggles with baking just might be due to differences in flour! 

A more coarse flour will not absorb liquid or fat as well. This would explain why I would follow my own recipe exactly, and end up with something closer to pancake batter than scone dough! After thinking through which flour was the lighter layer, I thought my problems were solved...but still faced struggles with almost every bake.

Finally, I went online and ordered some of both the usual brands of millet flour, as well as a third brand I found on Amazon. 


I opened all three and did a side-by-side comparison. Can you see the subtle color difference between them?


I picked up a pinch of each flour and rubbed it between my fingers. One of the standard brands felt silky and fine (the one in the middle). The other, darker flour (on the left) had a gritty feeling. The third brand fell somewhere between gritty and smooth. I finally had my answer!

Because I hate to waste food, I mixed all three in my canister rather than throwing out the coarsest one. Together, the texture is not bad. Now I know, though, which one works best for me. If I can't find the smooth one in stores, I can always buy it online. I'm sure you're waiting with bated breath to know which was the winner. 😉 I won't keep you in suspense any longer...

And the winner, of the finest, most silky millet flour award, is...


Bob's Red Mill! 

Also...it's a good thing I had these pictures. As I wrote this, I was thinking it was Arrowhead that turned out to be the finer flour. I had to go back to this side-by-side to remember which was truly the best. And..it's Bob's! Not that Arrowhead is not a good flour. It's just a slightly coarser grind, almost like a semolina wheat flour. You can use it, and it will work very well, as long as you use slightly less fat and liquid. The Relative flour would also work fine, as long as adjustments are made. Should I add notes to this effect with my recipes? That the amounts need to be adjusted slightly, depending on the brand of flour? It does affect the results. Yeah, I probably will. 

The other discovery I recently made did not require the same degree of research, but did solve a bewildering problem.

* Sweet

Over the past couple of months, sometimes my scones would have this funky texture. Rather than being light and tender, they would seem gummy and rubbery...almost stretchy. It was very odd. Recently, I had two different scone recipes that sounded good, so I made them both on the same day. I used honey for the first, but that emptied the bottle. For the second batch, I switched to agave nectar. They're both liquid sweeteners, so this should be fine, right? Ha! 

The first batch, a recipe I'll be sharing soon, turned out beautifully. The second had that same odd, wet, rubbery texture.  Aha!!! It was...the agave nectar!

Though both are liquid sweeteners, there is something about agave nectar that changes the whole result. 

I'd switched to agave nectar, as honey is a little higher on the glycemic index and can be inflammatory. Now I know that agave nectar changes things in a way that I do not enjoy.

My new options: use honey, but use less of it. Use another sweetener.

I'd been boosting the sweetness level in the recipe and had actually doubled the amount of honey. I'll try backing it off again and see what I think. I've also thought of using coconut nectar instead. That is fairly low on the glycemic scale, but has a different, almost caramel-like flavor. Will it be too strong a flavor? Will the change it brings be tasty or a little too much? I'll let you know. 

~ Thank you for joining me on this fascinating journey 😉 into the science and alchemy of alternative baking. I hope it's proven informative and helpful.

Thanks for stopping by.

Tuesday, April 21, 2020

"Everything-free" Honey Butter Biscuits...or Scones

I have been stuck in a debate over whether to call these biscuits or scones. The sweetness tips the scale toward scones, but I love the rhythm and alliteration of the name Honey Butter Biscuits. Can they be both?


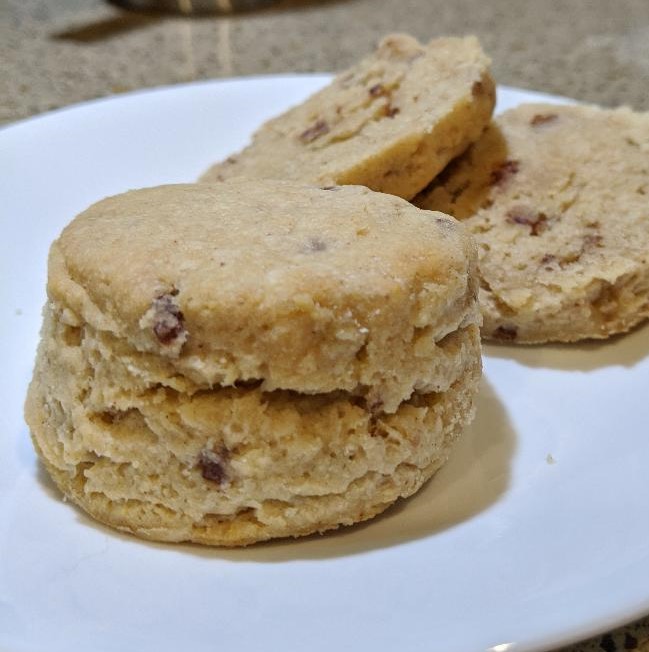
See the rise on those? They turned out beautifully!

They are free of gluten, dairy, eggs, soy, almonds, sorghum, and nightshades. If you use a special baking powder (and a substitute for the xanthan gum, they can be corn-free too. (see note below)>>

This is a recipe that I just came up with a couple of days ago. I made them for the first time yesterday morning (my birthday) and they made a delicious part of my breakfast.

The idea was birthed from thinking about biscuits topped with butter and honey. I suddenly wondered how it would work to put the honey and butter into the biscuits themselves. I am loving the results! These are tender, with a nice crunch to the bottoms. They have a pleasant, light sweetness from the honey, and a buttery feel from the coconut oil. They paired beautifully with my mug of lemon balm tea cooled with coconut milk.


"Everything-free" Honey Butter Biscuits
free of gluten, dairy, eggs, soy, almonds, nightshades, rice (and corn)

makes about 12, using a 2" cutter
preheat oven to 375 or 400 Fahrenheit ****
Line your baking sheet or pan with parchment paper (or lightly oil)

"Buttermilk"
1/2 cup non-dairy milk  
      (I use Silk or SoDelicious unsweetened original coconut milk beverage)
1 Tablespoon lemon juice
Set aside until needed.

Dry ingredients
2 cups gluten-free flour (I use 1 cup each of millet flour and arrowroot starch)
2 teaspoons baking powder
1/2 teaspoon xanthan gum*
1/2 teaspoon salt

Combine dry ingredients in a large bowl and whisk together thoroughly.
Cut in:
1/2 cup Spectrum palm-kernel oil shortening/all-vegetable shortening
   (Other butter alternatives, such as Earth Balance buttery sticks, should work well) 

Wet ingredients
1/4 cup liquid honey***
2 teaspoons melted buttery-flavored coconut oil
Stir together, then add, along with the soured milk.**
Make a "well," or small hollow, in the middle of the dry ingredients. Pour the wet ingredients into the well, then mix together, using a fork.


 Isn't that a beautiful dough?

Scoop dough onto a surface dusted with more gluten free flour (a tablespoon or two each of millet flour and arrowroot starch, mixed together). Gently fold dough over onto itself several times, then pat out or roll to about 1 1/4" thick. Use a sharp cutter, dipping in flour between cuts.

Place rounds on prepared sheet, leaving  an inch or two between them.
Bake for around 18 minutes, until they're cooked in the middle and the bottoms are lightly golden brown.
Transfer to cooling rack so bottoms don't continue to cook on the hot pan.

>>Leftover gluten-free baked goods are better when warmed. I've found that 9 or 10 seconds in the microwave works well for a single item (biscuit, scone, muffin). This restores its soft, light texture. 

****Biscuits and scones usually cook at 400 or higher. Because our oven is quirky (a very small, gas-powered RV oven) I've had to lower the baking temperature. If you're using a normal oven, and it doesn't run hot, you could safely bake at 400. An inexpensive oven thermometer is a good way to find out how accurate the settings are on your oven. If things always seem to over-brown before they're cooked through, then you probably need to reduce your cooking temperature by 25-50 degrees for most recipes.

***Liquid honey- as in a normally runny consistency. If your honey has crystalized and turned solid, you can warm it to make it flow again. A common method is to set the closed container of honey in a larger container and add hot water. Just be sure that the water level stays below the edge of the honey container. Runny honey is good. Watery honey would be sad.

**If the milk is still cool from being refrigerated, it will instantly turn the melted coconut oil to hard little clumps. Mixing the coconut oil with the honey first helps to prevent this.

*Xanthan gum serves a very important function in gluten-free baking. It sort of acts like gluten, thickening the dough and giving it structure. >>>Xanthan gum can be derived from corn. People often substitute guar gum for the xanthan gum if this is a concern.<<<


Saturday, April 4, 2020

"Everything-free" Apricot, Honey & Almond Scones

The process of developing this recipe has made me very happy. They are just so good!

They've quickly become one of my new favorites- tender and lightly sweet, buttery and flavorful, and also free of gluten, dairy and eggs. 

I've made them both as drop scones and cut. I've made them with chopped, dried apricots and with Apricot Jammy Bits from King Arthur Flour. Every way seemed just right to me, so I've included directions for all those variations.


"Everything-free" Apricot, Honey and Almond Scones
Makes 8-12
total time- about one hour (Bake 15-20 minutes)
Preheat oven to 375 degrees Fahrenheit
Line baking sheet with parchment paper, or oil it lightly

"Buttermilk"
1/2 cup alternative milk (2/3 cup for drop scones)
I use SoDelicious or Silk brand coconut milk beverage.
2 Tablespoons lemon juice
Combine and let sit to curdle until needed.


Dry ingredients:
2 cups gluten-free flour
      (I use 1 cup millet flour + 1 cup arrowroot or tapioca starch)
2 teaspoons double-acting baking powder
1/2 teaspoon xanthan gum
1/2 teaspoon salt
Combine in a large mixing bowl and whisk together thoroughly.


Fat:
1/2 cup butter-alternative
(I use Spectrum palm kernel oil shortening. Most butter alternatives should work.)
Using a pastry blender, cut fat into dry ingredients .


 Wet ingredients:
Combine in a smaller bowl~
3 Tablespoons honey
2 teaspoons melted coconut oil (I use "buttery flavored" coconut oil)
1 teaspoon almond extract (If you can't tolerate almond, use vanilla.)


Whisk together well, then add soured milk. If the cold milk touches the melted coconut oil before it's mixed with other things, the coconut oil will turn to hard little chunks.
Add wet ingredients to dry and stir with a fork. When about halfway combined, add apricots.


Additions:
1/4 cup dried apricots, chopped small
*toss chopped apricots with a teaspoon or two of flour or starch, to keep from clumping together*
-OR-
2 Tablespoons King Arthur Flour brand Apricot Jammy Bits

Stir until thoroughly combined. 
(Xanthan gum needs vigorous stirring, in order to activate properly.)


Shaping:
-Drop Scones- (Makes about 12 drop scones)
Scoop dough onto prepared baking sheet, in blobs of about three tablespoons. I use a dough scoop for this. They don't need to be nicely shaped. Drop scones are meant to be rough and irregular. Space them an inch or two apart, to allow for spreading as they bake.

-Cut Scones-(Using a 1 1/2" cutter, I get around 8 or 9 scones)
Lightly flour a clean board or surface. Turn dough out onto prepared surface. Gather into a ball, then gently fold dough in half. Flatten it slightly, then fold again. Repeate several times. Gently roll or pat dough to about one-inch thickness. Use a sharp cutter, dipped in flour to help prevent sticking.

You can also shape dough into a rectangle and cut into squares with a sharp knife, into a circle and cut into triangles, or into a rectangle and then into small triangles. The baking time will be longer for larger scones, less for smaller.

Bake in preheated oven for 15-20 minutes. Mine usually take 18 minutes.

Drop scones ready to bake ~


Cut scones in the making~ and finished, jeweled with apricot goodness.


Here's a link for the King Arthur apricot jammy bits. They also come in raspberry, strawberry, peach, cherry, apple cinnamon, orange and blueberry.
 https://shop.kingarthurflour.com/items/apricot-jammy-bits-8-oz


Friday, February 28, 2020

"Everything-free" Cinnamon Walnut Scones


These are SO good! With a mug of honey-sweetened tea, they're just right for this chilly February day. ***Revised and updated May 14, 2020***


For years, when I would go home to visit, I went with my sister to the Farmer's Market in our hometown. There was one table I always made sure to go to, where they sold goods from a local baker. He made the most delicious cinnamon and walnut scones; simple, but so very good.

The scones I made this week remind me of those old favorites. I loved them so much that I took a picture and posted it on Instagram. I just had to share the joy! :)

The cinnamon bits I use are from the King Arthur Flour company. Cinnamon chips that I've seen in grocery stores don't have the same flavor. They tend to taste like those hot cinnamon candies- not at all what I want in a scone! The ones from King Arthur, called Cinnamon Sweet Bits, taste like real cinnamon; like the filling of good cinnamon rolls. They used to carry a version that was in the classic "chip" shape, but those had a little dairy in them. The ones they carry now are irregular bits and small chunks- and they are dairy-free! It's best to order them in the cooler months of the year. Baking chips can melt if shipped during hot weather.

Here's a link to the ones I use:
https://shop.kingarthurflour.com/items/cinnamon-sweet-bits

If you don't have cinnamon bits to add to these scones, they will still be very good. 

Cinnamon Walnut Scones
makes 8-10
Heat oven to 375 degrees Fahrenheit
Bake time: 15-20 minutes

Line baking sheet with parchment paper (prevents sticking)
I use an AirBake baking sheet, which helps with even browning and helps to prevent burning.

Combine:
1/2 alternative milk
   (I use Silk or SoDelicious unsweetened original coconut milk)
2Tablespoon vinegar or lemon juice
   (I use coconut vinegar. Apple cider vinegar would work just as well)

"Souring" the milk (essentially turning it into buttermilk) helps to lighten the scones, giving a better rise. You can certainly skip this step, but I do like the improved texture that it gives.

In mixing bowl, combine:
2 cups gluten-free flour mix 
     (I use: 1 cup fine millet flour, 1 cup arrowroot or tapioca starch)
1 Tablespoon baking powder  
1/2 teaspoon xanthan gum
1/2 teaspoon salt
1/2 teaspoon cinnamon (if not using Cinnamon Bits, increase cinnamon to 1 1/2 tsp.)

Cut into dry ingredients:
1/2 cup butter alternative
     (I use Spectrum palm kernel oil shortening. Earth Balance soy-free buttery sticks or Melt sticks would also work. For those who can have dairy, real butter should also work. If using real butter, skip the coconut oil. Real butterfat will give the texture that I approximate with coconut oil.)

Add and stir with a fork:
3 Tablespoons agave nectar or honey

2 teaspoons melted coconut oil 
   (I use butter flavored coconut oil, but unflavored coconut oil would work as well. The coconut oil is not essential but gives a nice, buttery "feel.")
1 teaspoon vanilla (gluten-free, if you're especially sensitive to gluten)
( the soured milk)


When wet ingredients are halfway mixed into wet, add:
2 Tablespoons chopped walnuts
      (If not using Cinnamon Bits, increase chopped walnuts to 1/4 cup)
2 Tablespoons Cinnamon Sweet Bits

Stir until well combined. Gluten-free dough is not as sensitive to over-mixing as wheat-based doughs. On a surface lightly floured with gluten-free flour (I use the same mix- millet + arrowroot) gently gather dough together, folding it over onto itself a few times. Make sure there is enough flour mix underneath to keep it from sticking to the surface.

Pat dough into a rough circle, about 1" thick. Using a sharp round cutter (I use a 2 1/4" biscuit cutter) cut out scones, dipping the cutter into a bit of the flour mix between cuts. This helps to keep the dough from sticking to the cutter. Place scones on parchment lined baking sheet. Regather dough and pat out again as needed.

Bake at 375 degrees for 15- 20 minutes, until scones are cooked through and bottoms are lightly golden. (If you make smaller scones, 15 minutes should be plenty of baking time)

Transfer to cooling rack.  
(If left on the hot pan, the bottoms will continue to brown and become tough.)

Store airtight and eat within a few days. For best texture, reheat a scone for 9 or 10 seconds in the microwave. Re-warming gluten-free baked goods restores their soft, pleasing texture.

----------------------------------------------------------------

Link to the cutters I use. They're sturdy, stainless steel and affordable.
For scones, I use the second-largest of the set:

https://www.amazon.com/gp/product/B0001X9H3W/ref=ppx_yo_dt_b_search_asin_title?ie=UTF8&psc=1

For measuring things like shortening, honey, agave nectar, or nut butter, I use a Pampered Chef brand measuring tool. Once you've measured the ingredient, you simply push it out into the bowl. It's so much easier than trying to scoop or scrape sticky, greasy things from measuring cups or spoons! Here's a link to the one I use:

https://www.amazon.com/Pampered-Chef-Mini-Measure-All/dp/B001F0LYDQ/ref=sr_1_3?crid=BR2RRCARN3Y5&keywords=pampered+chef+measuring+cups&qid=1582915931&s=home-garden&sprefix=pampered+chef+meas%2Cgarden%2C165&sr=1-3

The one in the link above measures in increments of tablespoons, ounces or fractions-of-cups up to one cup. This makes measuring out three tablespoons of agave nectar or honey simple and easy. They also have a larger version that measures up to 2 cups, and a small one that will measure teaspoons.

Baking time may vary, depending on your oven. We live in an RV (travel trailer) so my baking is done in a very small gas oven. Check scones two or three minutes early, in case your oven cooks faster than mine does.


***I just learned how to properly insert links into my blog posts, so they will actually work! :)

Saturday, February 8, 2020

"Everything-free" Currant, Orange & Honey Scones

I just made these for the first time last night and I like them so much that I want to share the recipe right away. Why wait? Scones now! :-)


"Everything-free" Currant, Orange and Honey Scones
vegan, gluten-free, dairy-free, soy-free, egg-free, nightshade-free 
(nut-free if you use a different milk)
Makes 8-10 scones

Preheat oven to 375 degrees Fahrenheit
Line baking sheet with parchment paper

Combine:
1/2 cup coconut milk (or other alternative milk of your choice)
     I use SoDelicious Unsweetened Original or Silk Unsweet coconut milk
2 Tablespoons lemon juice

In a mixing bowl, combine:
2 cups gluten-free flour 
      I use 1 cup millet flour & 1 cup arrowroot or tapioca starch
2 1/2 teaspoons baking powder  
      (a full tablespoon is just a little too much- gives them a bitter edge) 
       I use Rumford's aluminum-free baking powder
1/2 teaspoon xanthan gum
1/2 teaspoon salt
     I usually use pink Himalayan salt

Whisk dry ingredients together well.

Add, and cut in well with pastry blender:
1/2 cup Spectrum palm kernel oil shortening (or butter alternative of your choice)

Make a well in the center and add soured coconut milk, along with:
3 Tablespoons honey
2 tablespoons dried currants 
      (I've found these in both the bulk section and pre-packaged with the dried fruits)
2 teaspoons melted buttery-flavored coconut oil
     Important for flavor and texture
Zest of one orange     
     My orange was large, so this equaled about 1 Tablespoon. 
     I use a micro-plane grater for zesting.

Mix wet ingredients into dry with a fork.
When about halfway combined, add:
2 Tablespoons dried currants
Mix well.

Turn dough out onto a lightly (gluten-free) floured surface. Fold/knead very gently just a few times, to combine the dough well, then pat out into a rough circle, about 1" thick. I use a 2 1/4" biscuit cutter, with a nice, sharp cutting edge. A dull cutter will mash the edges, and inhibit the rise. Dip the cutter into a bit of gluten-free flour between cuts. Arrange on the parchment-lined baking sheet with about an inch of space between the scones. Let rest for five to ten minutes before baking.

Bake in preheated 375 degree oven for 15-20 minutes, until bottoms are lightly golden and centers are cooked. Remove from pan and set on a cooling rack. If left on the pan, the bottoms will continue to brown.

**Leftover gluten-free baked goods are usually better if they're warmed up slightly. I warm a single muffin, scone or biscuit for 9 or 10 seconds in the microwave. When they're slightly warm, they are much softer and have a more enjoyable texture.

Store in an airtight container and eat within a few days. They will also freeze well.


*We live in an RV/travel trailer, so my baking is done in a small (15" square) gas oven. The time and temperature may vary, depending on your oven size and type. I use an Air-Bake baking sheet, to prevent over-browning of the bottoms. The oven is so small, and the rack so close to the heat, that things burn more easily than in a standard oven.


Wednesday, December 12, 2018

Change, and change, and change again...the latest

Over the years, my diet has undergone upheaval after change after change after upheaval. My cooking and baking have had to stop and regroup and take on a whole new shape with each change. The first, over twenty-five years ago, was giving up dairy. Wow. That was earth-shaking for us. Almost our entire diet consisted of Mexican and Italian foods, and our fridge was heavily stocked with all kinds of dairy products at all times. Over time we adapted, until living dairy-free became our norm. Our kids grew up in a home that was almost entirely dairy-free.

About twenty years ago, I started having trouble with garlic, tomatoes, and chocolate. It took a while, but I was able to figure out which foods were the culprits behind my digestive distress. Giving up garlic and tomatoes was not easy, but I was able to make that change. Chocolate, though...that was a long, painful struggle. It took over two decades for me to reach the place where it rarely tempts me.

Nearly a decade ago, I hit another big change. After months of misery, I found a naturopath who ran blood tests to discover food intolerances. My results were surprising...and not surprising. My system was in a complete state of panic and had at least some reaction to every single food on the list. At the same time, I learned that I am insulin-resistant (a condition that often leads to diabetes).

These discoveries necessitated a comprehensive overhaul of my entire food world.

No eggs, dairy, wheat (or any wheat-type grain), soy, almonds, garlic, tomatoes, chocolate, peanuts, onions, asparagus, cranberries...

...greatly reduced intake of starches and sugars... not easy for a sugar addict like myself.

In time, I was able to adapt to this restricted diet. It has not been easy, but I have learned how to eat within those limited parameters.

As time passed, I found that more foods have started to bother me: sorghum, cashews, fresh greens...potatoes, bell peppers...

This has all been a profound challenge, and has taxed my ingenuity as I've adapted and invented recipes to make it all work.

And now.....now it is not a dietary change, but a life change that has thrown my baking another curve ball.

My husband and I have begun our life of living full-time in an RV (bumper-pull/travel trailer/pull-behind trailer). As someone who cooks and bakes from scratch (partly from preference, mostly of necessity- I cannot eat most prepared foods), this new living situation presents some stiff challenges.

For a trailer, the kitchen is good-sized......but for a baker? Wow. I'm working with about an eight-inch by sixteen-inch space on the counter, for all bowls, ingredients, mixing and shaping. And the oven is a typical RV oven- fifteen inches square! And it is a gas oven. I have used a gas stove/oven before...but that was about twenty-nine years ago.

So, here I am again, in a phase of comprehensive change, figuring out yet again how to make it all work. I have just finished my first attempt at tiny-space baking.

Oh, and I can't seem to find the baking sheet that I bought to fit this oven...so I baked scones on the pizza stone....which will take another level of adaptation and experimentation.

The scones are alright. The dough was far too wet, so they are very fragile, but the flavor is good. The bottoms burned but as long as I just eat the tops, they'll be fine. :)

It should be an interesting ride, continuing to produce food that I can eat, in tight quarters, under constantly changing elevations and conditions. :)