Tuesday, April 21, 2020

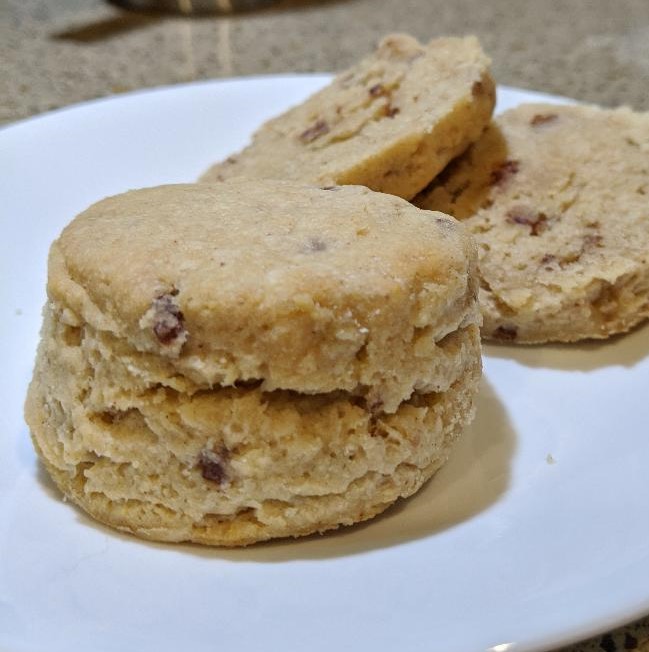
"Everything-free" Honey Butter Biscuits...or Scones

I have been stuck in a debate over whether to call these biscuits or scones. The sweetness tips the scale toward scones, but I love the rhythm and alliteration of the name Honey Butter Biscuits. Can they be both?


See the rise on those? They turned out beautifully!

They are free of gluten, dairy, eggs, soy, almonds, sorghum, and nightshades. If you use a special baking powder (and a substitute for the xanthan gum, they can be corn-free too. (see note below)>>

This is a recipe that I just came up with a couple of days ago. I made them for the first time yesterday morning (my birthday) and they made a delicious part of my breakfast.

The idea was birthed from thinking about biscuits topped with butter and honey. I suddenly wondered how it would work to put the honey and butter into the biscuits themselves. I am loving the results! These are tender, with a nice crunch to the bottoms. They have a pleasant, light sweetness from the honey, and a buttery feel from the coconut oil. They paired beautifully with my mug of lemon balm tea cooled with coconut milk.


"Everything-free" Honey Butter Biscuits
free of gluten, dairy, eggs, soy, almonds, nightshades, rice (and corn)

makes about 12, using a 2" cutter
preheat oven to 375 or 400 Fahrenheit ****
Line your baking sheet or pan with parchment paper (or lightly oil)

"Buttermilk"
1/2 cup non-dairy milk  
      (I use Silk or SoDelicious unsweetened original coconut milk beverage)
1 Tablespoon lemon juice
Set aside until needed.

Dry ingredients
2 cups gluten-free flour (I use 1 cup each of millet flour and arrowroot starch)
2 teaspoons baking powder
1/2 teaspoon xanthan gum*
1/2 teaspoon salt

Combine dry ingredients in a large bowl and whisk together thoroughly.
Cut in:
1/2 cup Spectrum palm-kernel oil shortening/all-vegetable shortening
   (Other butter alternatives, such as Earth Balance buttery sticks, should work well) 

Wet ingredients
1/4 cup liquid honey***
2 teaspoons melted buttery-flavored coconut oil
Stir together, then add, along with the soured milk.**
Make a "well," or small hollow, in the middle of the dry ingredients. Pour the wet ingredients into the well, then mix together, using a fork.


 Isn't that a beautiful dough?

Scoop dough onto a surface dusted with more gluten free flour (a tablespoon or two each of millet flour and arrowroot starch, mixed together). Gently fold dough over onto itself several times, then pat out or roll to about 1 1/4" thick. Use a sharp cutter, dipping in flour between cuts.

Place rounds on prepared sheet, leaving  an inch or two between them.
Bake for around 18 minutes, until they're cooked in the middle and the bottoms are lightly golden brown.
Transfer to cooling rack so bottoms don't continue to cook on the hot pan.

>>Leftover gluten-free baked goods are better when warmed. I've found that 9 or 10 seconds in the microwave works well for a single item (biscuit, scone, muffin). This restores its soft, light texture. 

****Biscuits and scones usually cook at 400 or higher. Because our oven is quirky (a very small, gas-powered RV oven) I've had to lower the baking temperature. If you're using a normal oven, and it doesn't run hot, you could safely bake at 400. An inexpensive oven thermometer is a good way to find out how accurate the settings are on your oven. If things always seem to over-brown before they're cooked through, then you probably need to reduce your cooking temperature by 25-50 degrees for most recipes.

***Liquid honey- as in a normally runny consistency. If your honey has crystalized and turned solid, you can warm it to make it flow again. A common method is to set the closed container of honey in a larger container and add hot water. Just be sure that the water level stays below the edge of the honey container. Runny honey is good. Watery honey would be sad.

**If the milk is still cool from being refrigerated, it will instantly turn the melted coconut oil to hard little clumps. Mixing the coconut oil with the honey first helps to prevent this.

*Xanthan gum serves a very important function in gluten-free baking. It sort of acts like gluten, thickening the dough and giving it structure. >>>Xanthan gum can be derived from corn. People often substitute guar gum for the xanthan gum if this is a concern.<<<


Saturday, April 4, 2020

"Everything-free" Apricot, Honey & Almond Scones

The process of developing this recipe has made me very happy. They are just so good!

They've quickly become one of my new favorites- tender and lightly sweet, buttery and flavorful, and also free of gluten, dairy and eggs. 

I've made them both as drop scones and cut. I've made them with chopped, dried apricots and with Apricot Jammy Bits from King Arthur Flour. Every way seemed just right to me, so I've included directions for all those variations.


"Everything-free" Apricot, Honey and Almond Scones
Makes 8-12
total time- about one hour (Bake 15-20 minutes)
Preheat oven to 375 degrees Fahrenheit
Line baking sheet with parchment paper, or oil it lightly

"Buttermilk"
1/2 cup alternative milk (2/3 cup for drop scones)
I use SoDelicious or Silk brand coconut milk beverage.
2 Tablespoons lemon juice
Combine and let sit to curdle until needed.


Dry ingredients:
2 cups gluten-free flour
      (I use 1 cup millet flour + 1 cup arrowroot or tapioca starch)
2 teaspoons double-acting baking powder
1/2 teaspoon xanthan gum
1/2 teaspoon salt
Combine in a large mixing bowl and whisk together thoroughly.


Fat:
1/2 cup butter-alternative
(I use Spectrum palm kernel oil shortening. Most butter alternatives should work.)
Using a pastry blender, cut fat into dry ingredients .


 Wet ingredients:
Combine in a smaller bowl~
3 Tablespoons honey
2 teaspoons melted coconut oil (I use "buttery flavored" coconut oil)
1 teaspoon almond extract (If you can't tolerate almond, use vanilla.)


Whisk together well, then add soured milk. If the cold milk touches the melted coconut oil before it's mixed with other things, the coconut oil will turn to hard little chunks.
Add wet ingredients to dry and stir with a fork. When about halfway combined, add apricots.


Additions:
1/4 cup dried apricots, chopped small
*toss chopped apricots with a teaspoon or two of flour or starch, to keep from clumping together*
-OR-
2 Tablespoons King Arthur Flour brand Apricot Jammy Bits

Stir until thoroughly combined. 
(Xanthan gum needs vigorous stirring, in order to activate properly.)


Shaping:
-Drop Scones- (Makes about 12 drop scones)
Scoop dough onto prepared baking sheet, in blobs of about three tablespoons. I use a dough scoop for this. They don't need to be nicely shaped. Drop scones are meant to be rough and irregular. Space them an inch or two apart, to allow for spreading as they bake.

-Cut Scones-(Using a 1 1/2" cutter, I get around 8 or 9 scones)
Lightly flour a clean board or surface. Turn dough out onto prepared surface. Gather into a ball, then gently fold dough in half. Flatten it slightly, then fold again. Repeate several times. Gently roll or pat dough to about one-inch thickness. Use a sharp cutter, dipped in flour to help prevent sticking.

You can also shape dough into a rectangle and cut into squares with a sharp knife, into a circle and cut into triangles, or into a rectangle and then into small triangles. The baking time will be longer for larger scones, less for smaller.

Bake in preheated oven for 15-20 minutes. Mine usually take 18 minutes.

Drop scones ready to bake ~


Cut scones in the making~ and finished, jeweled with apricot goodness.


Here's a link for the King Arthur apricot jammy bits. They also come in raspberry, strawberry, peach, cherry, apple cinnamon, orange and blueberry.
 https://shop.kingarthurflour.com/items/apricot-jammy-bits-8-oz


Friday, February 28, 2020

"Everything-free" Cinnamon Walnut Scones


These are SO good! With a mug of honey-sweetened tea, they're just right for this chilly February day. ***Revised and updated May 14, 2020***


For years, when I would go home to visit, I went with my sister to the Farmer's Market in our hometown. There was one table I always made sure to go to, where they sold goods from a local baker. He made the most delicious cinnamon and walnut scones; simple, but so very good.

The scones I made this week remind me of those old favorites. I loved them so much that I took a picture and posted it on Instagram. I just had to share the joy! :)

The cinnamon bits I use are from the King Arthur Flour company. Cinnamon chips that I've seen in grocery stores don't have the same flavor. They tend to taste like those hot cinnamon candies- not at all what I want in a scone! The ones from King Arthur, called Cinnamon Sweet Bits, taste like real cinnamon; like the filling of good cinnamon rolls. They used to carry a version that was in the classic "chip" shape, but those had a little dairy in them. The ones they carry now are irregular bits and small chunks- and they are dairy-free! It's best to order them in the cooler months of the year. Baking chips can melt if shipped during hot weather.

Here's a link to the ones I use:
https://shop.kingarthurflour.com/items/cinnamon-sweet-bits

If you don't have cinnamon bits to add to these scones, they will still be very good. 

Cinnamon Walnut Scones
makes 8-10
Heat oven to 375 degrees Fahrenheit
Bake time: 15-20 minutes

Line baking sheet with parchment paper (prevents sticking)
I use an AirBake baking sheet, which helps with even browning and helps to prevent burning.

Combine:
1/2 alternative milk
   (I use Silk or SoDelicious unsweetened original coconut milk)
2Tablespoon vinegar or lemon juice
   (I use coconut vinegar. Apple cider vinegar would work just as well)

"Souring" the milk (essentially turning it into buttermilk) helps to lighten the scones, giving a better rise. You can certainly skip this step, but I do like the improved texture that it gives.

In mixing bowl, combine:
2 cups gluten-free flour mix 
     (I use: 1 cup fine millet flour, 1 cup arrowroot or tapioca starch)
1 Tablespoon baking powder  
1/2 teaspoon xanthan gum
1/2 teaspoon salt
1/2 teaspoon cinnamon (if not using Cinnamon Bits, increase cinnamon to 1 1/2 tsp.)

Cut into dry ingredients:
1/2 cup butter alternative
     (I use Spectrum palm kernel oil shortening. Earth Balance soy-free buttery sticks or Melt sticks would also work. For those who can have dairy, real butter should also work. If using real butter, skip the coconut oil. Real butterfat will give the texture that I approximate with coconut oil.)

Add and stir with a fork:
3 Tablespoons agave nectar or honey

2 teaspoons melted coconut oil 
   (I use butter flavored coconut oil, but unflavored coconut oil would work as well. The coconut oil is not essential but gives a nice, buttery "feel.")
1 teaspoon vanilla (gluten-free, if you're especially sensitive to gluten)
( the soured milk)


When wet ingredients are halfway mixed into wet, add:
2 Tablespoons chopped walnuts
      (If not using Cinnamon Bits, increase chopped walnuts to 1/4 cup)
2 Tablespoons Cinnamon Sweet Bits

Stir until well combined. Gluten-free dough is not as sensitive to over-mixing as wheat-based doughs. On a surface lightly floured with gluten-free flour (I use the same mix- millet + arrowroot) gently gather dough together, folding it over onto itself a few times. Make sure there is enough flour mix underneath to keep it from sticking to the surface.

Pat dough into a rough circle, about 1" thick. Using a sharp round cutter (I use a 2 1/4" biscuit cutter) cut out scones, dipping the cutter into a bit of the flour mix between cuts. This helps to keep the dough from sticking to the cutter. Place scones on parchment lined baking sheet. Regather dough and pat out again as needed.

Bake at 375 degrees for 15- 20 minutes, until scones are cooked through and bottoms are lightly golden. (If you make smaller scones, 15 minutes should be plenty of baking time)

Transfer to cooling rack.  
(If left on the hot pan, the bottoms will continue to brown and become tough.)

Store airtight and eat within a few days. For best texture, reheat a scone for 9 or 10 seconds in the microwave. Re-warming gluten-free baked goods restores their soft, pleasing texture.

----------------------------------------------------------------

Link to the cutters I use. They're sturdy, stainless steel and affordable.
For scones, I use the second-largest of the set:

https://www.amazon.com/gp/product/B0001X9H3W/ref=ppx_yo_dt_b_search_asin_title?ie=UTF8&psc=1

For measuring things like shortening, honey, agave nectar, or nut butter, I use a Pampered Chef brand measuring tool. Once you've measured the ingredient, you simply push it out into the bowl. It's so much easier than trying to scoop or scrape sticky, greasy things from measuring cups or spoons! Here's a link to the one I use:

https://www.amazon.com/Pampered-Chef-Mini-Measure-All/dp/B001F0LYDQ/ref=sr_1_3?crid=BR2RRCARN3Y5&keywords=pampered+chef+measuring+cups&qid=1582915931&s=home-garden&sprefix=pampered+chef+meas%2Cgarden%2C165&sr=1-3

The one in the link above measures in increments of tablespoons, ounces or fractions-of-cups up to one cup. This makes measuring out three tablespoons of agave nectar or honey simple and easy. They also have a larger version that measures up to 2 cups, and a small one that will measure teaspoons.

Baking time may vary, depending on your oven. We live in an RV (travel trailer) so my baking is done in a very small gas oven. Check scones two or three minutes early, in case your oven cooks faster than mine does.


***I just learned how to properly insert links into my blog posts, so they will actually work! :)

Saturday, February 8, 2020

"Everything-free" Currant, Orange & Honey Scones

I just made these for the first time last night and I like them so much that I want to share the recipe right away. Why wait? Scones now! :-)


"Everything-free" Currant, Orange and Honey Scones
vegan, gluten-free, dairy-free, soy-free, egg-free, nightshade-free 
(nut-free if you use a different milk)
Makes 8-10 scones

Preheat oven to 375 degrees Fahrenheit
Line baking sheet with parchment paper

Combine:
1/2 cup coconut milk (or other alternative milk of your choice)
     I use SoDelicious Unsweetened Original or Silk Unsweet coconut milk
2 Tablespoons lemon juice

In a mixing bowl, combine:
2 cups gluten-free flour 
      I use 1 cup millet flour & 1 cup arrowroot or tapioca starch
2 1/2 teaspoons baking powder  
      (a full tablespoon is just a little too much- gives them a bitter edge) 
       I use Rumford's aluminum-free baking powder
1/2 teaspoon xanthan gum
1/2 teaspoon salt
     I usually use pink Himalayan salt

Whisk dry ingredients together well.

Add, and cut in well with pastry blender:
1/2 cup Spectrum palm kernel oil shortening (or butter alternative of your choice)

Make a well in the center and add soured coconut milk, along with:
3 Tablespoons honey
2 tablespoons dried currants 
      (I've found these in both the bulk section and pre-packaged with the dried fruits)
2 teaspoons melted buttery-flavored coconut oil
     Important for flavor and texture
Zest of one orange     
     My orange was large, so this equaled about 1 Tablespoon. 
     I use a micro-plane grater for zesting.

Mix wet ingredients into dry with a fork.
When about halfway combined, add:
2 Tablespoons dried currants
Mix well.

Turn dough out onto a lightly (gluten-free) floured surface. Fold/knead very gently just a few times, to combine the dough well, then pat out into a rough circle, about 1" thick. I use a 2 1/4" biscuit cutter, with a nice, sharp cutting edge. A dull cutter will mash the edges, and inhibit the rise. Dip the cutter into a bit of gluten-free flour between cuts. Arrange on the parchment-lined baking sheet with about an inch of space between the scones. Let rest for five to ten minutes before baking.

Bake in preheated 375 degree oven for 15-20 minutes, until bottoms are lightly golden and centers are cooked. Remove from pan and set on a cooling rack. If left on the pan, the bottoms will continue to brown.

**Leftover gluten-free baked goods are usually better if they're warmed up slightly. I warm a single muffin, scone or biscuit for 9 or 10 seconds in the microwave. When they're slightly warm, they are much softer and have a more enjoyable texture.

Store in an airtight container and eat within a few days. They will also freeze well.


*We live in an RV/travel trailer, so my baking is done in a small (15" square) gas oven. The time and temperature may vary, depending on your oven size and type. I use an Air-Bake baking sheet, to prevent over-browning of the bottoms. The oven is so small, and the rack so close to the heat, that things burn more easily than in a standard oven.


Thursday, February 6, 2020

"Everything-free" Tuscan Soup

I have a wonderful recipe for Zuppa Toscana (Tuscan Soup) that I got from a friend some years ago. It is truly delicious. Unfortunately, when you take out all of the things I can no longer eat (potatoes, cream, onions, garlic) there is not much left: broth, meat and kale. Doesn't that sound delicious? Um...no.

For the past several years, I have been working on a version of this soup that would fit my new food world. I have hit on a satisfactory result a few times...only to find out that yet another food had started bothering me, so back to the drawing board. Or chopping board... ;-)

This is the version I am currently using. In fact, I just finished making a batch for my lunch today.

It is creamy and hearty, just right for a cold Winter day.


"Everything-free" Tuscan Soup
dairy-free, gluten-free, soy-free, nightshade-free
Serves 4
Total time: about an hour

1/2 pound each gluten-free bacon and mild Italian sausage- chop bacon into bite-sized chunks
    (I buy a pound of each, cook it all & save half to freeze for the next time I make soup)
1 quart chicken stock or broth
    (I usually use reduced-sodium, so I can control the overall saltiness. The meats tend to be very salty, which make can the soup far too salty if you also use full-sodium stock)
3-4 "white" sweet potatoes, peeled and cubed
    (These can be hard to find in some places; then I use standard orange sweet potatoes/yams)
(1/4 teaspoon dried minced onion- if you can tolerate it)
3/4 teaspoon dried thyme 
Several large leaves of kale, thoroughly washed, ribs cut out, leaves roughly chopped
1 (13.5 fl.oz.) can thick coconut milk (I use Native Forest brand)
Salt and black pepper to taste- I use roughly 1/4 teaspoon salt, 1/8 teaspoon pepper, added at the end

While the meats are cooking, I prepare the sweet potatoes and gather the other ingredients.


In a large soup pot, over medium to medium-high heat, cook sausage, stirring often, until cooked through. Remove to a bowl lined with paper towels, to drain off grease. Add chopped bacon pieces to pot. Keep at medium to medium-high until a few pieces start to brown, then turn down to medium-low. Stir often to avoid burning. When the bacon is mostly cooked (the fat has mostly rendered out and most of the pieces are browning) remove to a paper towel-lined bowl to drain grease. Pour the rest of the grease into a heat-proof container. (Don't pour it straight into the trash. The hot grease will melt a plastic garbage bag- voice of unfortunate, absent-minded experience!)


Add the quart of chicken stock to the pot, along with the sweet potato chunks, dried onion and thyme. Cover, bring to a boil, then turn down to a strong simmer. While waiting, prepare the kale. Check soup after 15 minutes. The sweet potatoes should be tender, but not falling apart. When ready, add meats back to the pot, along with the chopped kale. Add the can of coconut milk. As soon as the coconut milk is fully melted and stirred in, check the broth for flavor. Add salt and pepper if needed.The seasoning of sausage can vary widely, so it's good to wait until the end to finish seasoning. Cook for just a few minutes, until the kale just begins to soften.

Saturday, January 11, 2020

Everything-free Chicken and Dumplings

You guys.

You. Guys.

For real.

Chicken and Dumplings...gluten-free, dairy-free, egg-free, nightshade-free... all of the things.

I have been working on this for months. As in..the first version I tried was February 24. This is January 10. I have labored on this one! It needed to be right.

*** And then, when I was less tired, I read over this recipe again, and noticed some glaring mistakes that must be fixed and some amounts that I needed to refine. So...updated version...March 9, 2020.**

It's chilly and dark out, and I feel like I've just been listening to rain for days and days. It made it all feel better and more cozy, puttering around my little kitchen, cooking up a batch of comfort food.

I cooked late tonight, because tomorrow is a travel day and I will not want to cook dinner at the end of it. I roasted some broccoli, and I made my newest version of chicken and dumplings. And it is so good. The soup is creamy and flavorful, and the dumplings are light and delicious.

I will put a picture in here, but this is from an earlier version. I have a picture of tonight's batch, and I will add it later. It's on my phone. The blog is on my computer. I'm not that fancy. Right now, I just want to share this recipe! The batch in the picture was a more "brothy" soup. The final version is creamy and golden. Still, this will do for now.


 "Everything-free Chicken & Dumplings"
Serves 4 (or 2, with leftovers, which is how we roll)
Total time- about an hour

Boneless, skinless chicken breasts-1 package (usually around 1 to 1 1/4 pounds)
Lay pieces on a plate and season well on both sides with salt and pepper. Let rest while you prepare the rest of the ingredients.

*You will want to have everything ready before you start cooking. Those veggies can burn fast, while you're rummaging for the carton of stock! Voice of burnt-soup experience here!*

Olive oil - about 1/4 cup total
Carrots - two or three medium carrots, peeled and cubed = 1 1/2 cup
Celery - finely chopped = 1/2 cup
Fresh thyme - leaves stripped from the stems and slightly chopped = 1 Tablespoon
     **trust me, you want to use fresh thyme rather than dried, if you possibly can! I've used dried, several times, and it's not nearly as flavorful.**
Chicken broth/stock - about a quart
1 (13.5 ounce) can thick coconut milk (I use Native Forest brand)
Gluten-free flour - about 1/3 cup (I use half millet flour, half tapioca starch- 3 Tablespoons of each)
     **I tried arrowroot starch, but it loses its thickening capacity when heated- tapioca starch it is!
Salt and black pepper
 --------------------------
*Gluten-free flour mixture for soup:
3 Tablespoons millet flour
3 Tablespoons tapioca starch
1 teaspoon salt
1/4 teaspoon black pepper


Mix up dumpling dough while the chicken and veggies are having their turns to cook. Letting the dough rest before using lets the baking powder start to work, giving you lighter dumplings. (ingredients for dumplings listed below) 

Lay the chicken on a plate, season both sides, set aside. Chop veggies, prepare seasoned flour, prepare the fresh thyme and get out the other seasonings, stock and coconut milk.

When all your ingredients are assembled and ready, heat 2 Tablespoons  of olive oil in a soup pot over medium-high/high heat. Add chicken pieces, moving around a few times, to help prevent sticking. Sear on both sides, just until the outer part changes color (turns from pink to white, with maybe a few spots of browning). The inside will still be completely raw. This is what you want. Trust me. Remove chicken and save for later. [While the chicken is cooking, start making the dumpling dough]

Reduce heat to medium/medium- high and add 2 Tablespoons more olive oil to the pan. Let heat briefly, then add carrots, celery and thyme. Cook, stirring a few times, for a minute or two. [Work on dumpling dough while they cook.]

Reduce heat to medium/medium-low. Add flour mixture and other seasonings, and stir well. Cook, stirring frequently, for a couple of minutes.

Be very careful with the first addition of stock. Steam will come boiling out of the pan and it's easy to get your hand or arm scalded.
 
Slowly add about 1 cup of chicken stock, stirring until completely absorbed. Add the rest of the stock, about one cup at a time, stirring the whole time and scraping the bottom to get all the flavor bits loose.

Add coconut cream. Let heat and thicken for several minutes, scraping the bottom of the pan from time to time, to prevent sticking and burning. The consistency should become creamy and slightly thick. Taste for seasoning. Add more salt if needed. Do this now- you don't want to be tasting it once you've added back the mostly-raw chicken!

Cut chicken into bite-sized pieces and add to soup. Bring to a simmer, stirring often, and add dumplings. I use a spoon or fork to scoop up globs of dumpling dough about the size of a walnut/golf ball... about two or three tablespoons of dough at a time. Drop the pieces of dough gently onto the surface of the soup.

Cover and cook on low or medium-low heat for 20 minutes. Do not lift the lid! The dumplings cook by steaming. If you take the lid off, it slows the cooking and makes the dumplings heavy and dense.

On our stove (gas stove in a travel trailer), the low setting is equivalent to medium-low on our previous stoves (electric, glass top). Use the lowest setting on your stove that will maintain a gentle simmer. The low side of medium-low should be right for other stoves. If the heat is too high, the soup will scorch before the dumplings are done. Lower the heat and be willing to wait for it. :)


After twenty minutes, remove pan from the heat and let sit for five minutes or so.

I scoop the dumplings into a serving bowl, using a slotted spoon. I ladle soup from into bowls, then add two or three dumplings to each serving.

Herb Dumplings (gluten-free, dairy-free, egg-free)

1 cup millet flour
1 cup tapioca starch
1 Tablespoon baking powder
3/4 teaspoon xanthan gum
3/4 teaspoon dried parsley
1/2 teaspoon salt
--------
2/3 cup shortening (I use Spectrum palm kernel oil shortening. Earth Balance sticks or something similar would also work.)
1 teaspoon buttery-flavored coconut oil 
    (even this small amount makes a difference to taste and texture)
    (this won't always cut-in nicely with the shortening, so I often melt it and stir it in after the Spectrum is all cut in. If melted coconut oil is added to cold milk, the oil will turn to hard clumps.)

   
-------
3/4 cup milk alternative (I use SoDelicious or Silk unsweetened original coconut milk beverage)
  
Whisk together dry ingredients. Cut in shortening until no large clumps remain. Sprinkle in melted coconut oil and stir briefly with a fork. Stir in milk with a fork until well combined. Let dough rest until needed.


If making the dough mid-soup is stressful or chaos-inducing for you, mix it up before you start cooking the soup and cover the bowl with plastic wrap or a towel until it's needed.

Either way, letting the dough rest before using it makes a difference. "Double-acting" baking powder is activated by two things: liquid and heat. It first starts to work in reaction to the liquids in the dough. It's activity is boosted by the heat of steaming. Giving the baking powder a chance to start doing its thing before the dough goes onto the soup gives you lighter-textured dumplings.


Saturday, November 16, 2019

My new favorite Sausage, Sweet Potato, White Cabbage Soup

This has become one of my favorite soups. It's a great one for cool Fall or Winter evenings, hearty and flavorful but not heavy. Most of the ingredients are simple things you can keep on hand for when you need to whip up a pot of soup.


If I did not live in a travel trailer, with very limited storage space, I could build a collection of pretty bowls and plates to make food pictures more tempting. ;-) I wrote in my first post about deciding to ignore my perfectionist tendencies, which were telling me I should not publish a single thing until I knew how to do every part exactly right. I just went ahead and started the blog, willing to let it be imperfectly good. Silly, I think, to not share the yummy recipes I've developed and tips I've learned, just because it won't be perfect. :-)

Back to the recipe...

It began as a German Sausage Chowder recipe that our son brought home from Culinary Arts class when he was in high school. It quickly became a family favorite. As our food world grew increasingly complicated, we had to make changes to our favorite recipes. This one was no exception. Out went the cheese, cream, potatoes, and wheat flour thickener. The original called for bratwurst, which started to give me trouble for some reason, so I looked for another sausage that would work. I smiled when I saw that I was still calling this "German Sausage Chowder" on meal plans and recipe notes. Precious little of the original recipe remains. I made my adapted version recently, and it was so good that I wanted to share it with everyone. I hope you like it, too.

Favorite Sausage Soup
Total time ~ about one hour
Serves 4-6

1 pound mild Italian Sausage (gluten-free; I also use garlic-free when I can find it)

2 cups white sweet potatoes, peeled and cubed
*4 cups finely sliced and chopped white cabbage
     (time saving tip- use a bag of cabbage pre-shredded for coleslaw)
1/4 tsp. dried onion
     (I can't tolerate onions, but a small amount of dried onion seems okay for me)
1 tsp. salt
1/4 tsp. black pepper
1/2 tsp. dried parsley
 2 cups water

1 can (14.5 oz.) reduced sodium chicken stock
1 can (13.5 oz.) thick coconut milk (I use Native Forest)

1/4 cup gluten-free flour mix (I use 2T millet flour with 2T tapioca starch*)
1/2 cup water

(*I use tapioca for this, rather than arrowroot. Arrowroot starch loses its thickening powers when heated for long. I have had soups and sauces get nice and thick, then suddenly go watery, when I used arrowroot starch.)

 In a medium-sized soup pot, cook sausage completely. Remove most of the grease from the pot. (Either by draining sausage in a strainer, or soaking up grease from pot with paper towels)

Add potatoes and cabbage to the sausage in the pot, along with all of the seasonings, the can of stock and two cups of water. Stir, scraping up browned bits from the bottom of the pan (flavor nuggets!). Cover and simmer for 20 minutes, until sweet potatoes are nearly tender. Add coconut milk and heat to a low simmer. Taste and adjust seasonings to your preference.

In a small bowl, mix half-cup of water with the flour. Stir into soup, reduce heat and cook just until thickened slightly. Stir often to avoid scorching.

*If you like your cabbage less soft, add after sweet potatoes have cooked for fifteen minutes.
** Arrowroot starch loses its thickening properties if overheated. If you use arrowroot starch, it's important to add it at the end and turn off the heat as soon as it's thickened.
***White sweet potatoes are my favorite substitute for potatoes. As we've roamed the country this year, I've learned that these are not available everywhere. The recipe will work with orange sweet potatoes/yams. The white ones with their milder flavor are my preference, but I make it with yams when they're all I can get. :-)